
Confirm the Leak, Narrow the Line, and Find the Likely Repair Area
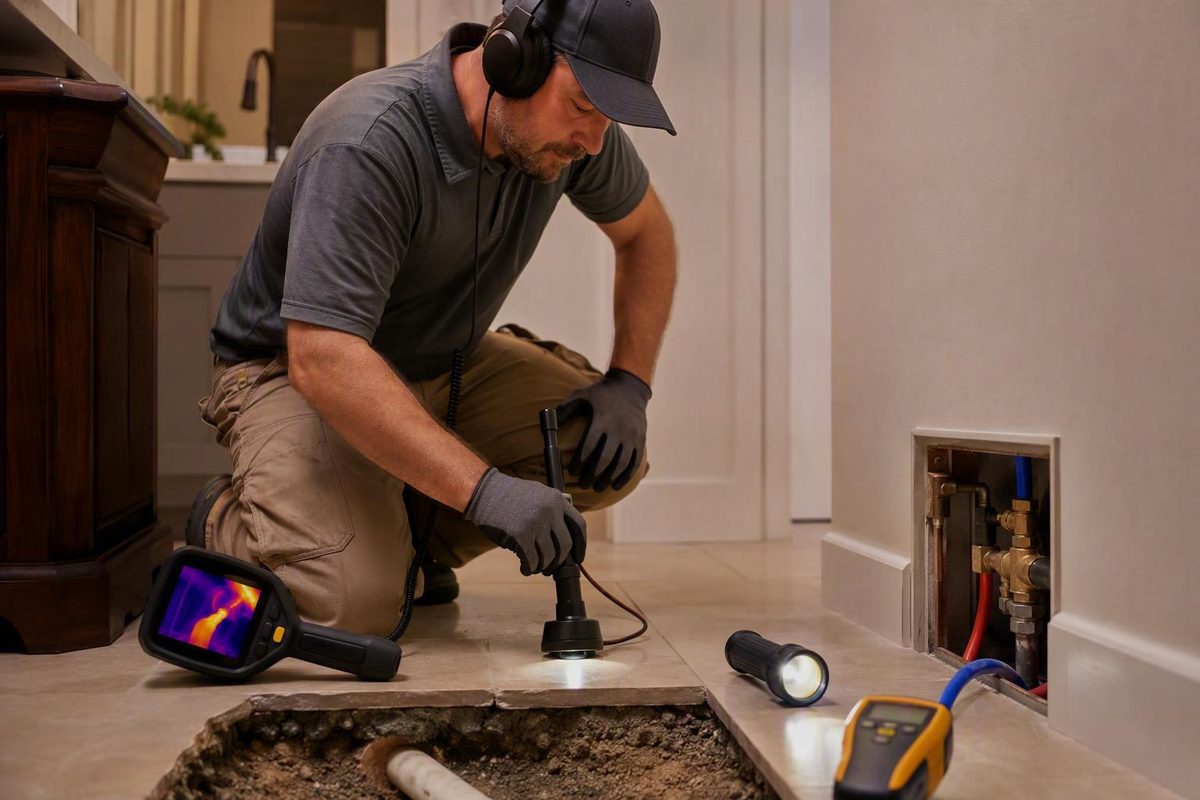
Use a no-use meter test to confirm flow, isolate the plumbing branch, then combine pipe tracing, acoustic, thermal, moisture and pressure findings.
Locating a suspected water leak beneath a concrete slab is not one test. It is a three-stage process:
- Confirm unexplained water flow.
- Narrow that flow to a plumbing branch.
- Use multiple compatible findings to identify and confirm the likely repair area.
The sequence matters. A moving water meter can confirm flow without identifying its source. A warm or damp floor can identify an affected area without revealing where a pipe failed. Opening flooring or concrete on the strength of one clue can create unnecessary damage and still miss the leak.
This guide primarily addresses concealed leaks in pressurized hot- and cold-water supply piping in single-family homes. Drain, sewer, groundwater, roof, condensation, and intermittent appliance leaks require different diagnostic approaches.
They are useful for understanding field methods, but they do not establish universal accuracy rates or guarantee that any instrument will identify an exact opening point.
What a slab leak is—and what locating one actually involves
A slab leak is leakage from a water pipe beneath or within a concrete slab foundation.
When determining how to locate a water leak under a slab, separate three questions:
- Is unexplained water flowing anywhere in the metered plumbing system?
- Which part of the plumbing system is most likely responsible?
- Where is the likely point of failure within that part of the system?
A water-meter test helps answer the first question. Shutoff-valve tests may narrow the second. Exact localization generally requires some combination of pipe-route tracing, acoustic comparison, thermal or moisture mapping, and pressure isolation. Accurate Leak & Line’s contractor overview similarly distinguishes an under-slab pipe leak from its surface symptoms and identifies line tracing and electronic listening as professional locating methods in its slab-leak guide.
These steps produce different levels of certainty:
- A rising meter reading during a valid no-use test indicates water is flowing downstream of the meter.
- Meter movement that repeatedly stops when a functional branch valve is closed implicates that branch.
- A warm area overlapping a plausible hot-water route makes one section more suspicious.
- A strong acoustic signal along the traced route adds compatible evidence.
- Pressure isolation may confirm or further narrow the leaking zone without necessarily identifying the exact hole.
Surface evidence can be displaced from the failure. The wettest, warmest, or loudest location is therefore not necessarily directly above the damaged pipe.
Before proceeding, consider whether another diagnostic path fits the symptoms better. The source may not be a pressurized supply leak if moisture:
- Appears only after a sink, shower, tub, dishwasher, or washing machine drains.
- Follows rain or irrigation but disappears during dry weather.
- Collects near HVAC condensate equipment, a refrigerator, or a humidifier.
- Smells like sewage or coincides with slow drains and backups.
- Enters through a wall, door, window, roof penetration, or exterior grade.
- Persists without reproducible meter movement.
Even so, the absence of repeatable unexplained flow should prompt investigation of competing sources before anyone removes flooring or concrete.
Recognize the clues, but do not treat them as proof
Possible warning signs include:
- An unexplained rise in water use or the water bill.
- Hissing, trickling, or whooshing when fixtures are off.
- Reduced or fluctuating pressure.
- Damp carpet, flooring, or baseboards.
- Warped wood, loose flooring, stains, or bubbling finishes.
- A localized musty odor or visible mold.
- Warm or unusually cool floor areas.
- More frequent water-heater operation.
- Cracks or other changes in the floor, walls, or slab.
These are reasons to investigate, not diagnoses. Golden Rule Plumbing’s homeowner checklist lists bill changes, water sounds, pressure symptoms, damp flooring, warm areas, odors, and damaged finishes while recognizing that a meter test establishes leakage somewhere rather than an exact under-slab location in its detection overview.
A warm floor is most useful when other evidence points toward a hot-water branch. Escaping hot water can warm surrounding material, and continuing loss may cause the water heater to operate more often. A cold-water leak may have no useful temperature signature.
Rank the evidence according to how directly it relates to unintended flow:
- Strong homeowner evidence: reproducible meter movement during a controlled no-use test.
- Strong branch evidence: movement that repeatedly starts or stops when a correctly identified, fully functional valve isolates a branch.
- Supporting evidence: running-water sounds, pressure symptoms, or a temperature anomaly along a plausible pipe route.
- Less-specific evidence: bill changes, dampness, odors, mold, flooring damage, or cracks.
A higher bill alone is weak evidence because household use may change with irrigation, guests, seasonal demand, pool filling, or new appliances. Pressure symptoms may arise from demand elsewhere, a municipal supply issue, a pressure regulator, a partly closed valve, or a restricted fixture.
Before attributing damp material to an under-slab pipe, check for:
- Running or intermittently refilling toilets.
- Dripping faucets and shower or tub valves.
- Leaking fixture supply connections.
- Washing-machine and dishwasher hoses.
- Refrigerator and ice-maker connections.
- Water-softener regeneration or discharge.
- Humidifiers and filtration equipment.
- Water-heater connections, valves, and drains.
- Irrigation valves, sprinkler heads, and schedules.
- Pool or spa filling equipment.
- Exterior hose connections.
- HVAC condensation.
- Rain, groundwater, grading, and exterior drainage.
- Drain leakage associated with fixture use.
Water migration further weakens surface clues. It can travel under flooring or along construction joints before becoming visible. A plumbing expert answering a concealed-leak question likewise cautioned that visible moisture may appear several feet from its origin and that handheld temperature checks may narrow the search only to a general area rather than pinpoint the break.
Document conditions before changing valves:
- Date and time of each symptom.
- Whether it is continuous or intermittent.
- Boundaries of damp, warm, stained, or damaged areas.
- Sounds and the conditions under which they occur.
- Water-heater cycling.
- Whole-house or fixture-specific pressure changes.
- Recent bills or usage history.
- Recent plumbing, flooring, heating, or remodeling work.
- Weather, irrigation, and appliance operation.
- Photographs from consistent positions.
Mark affected areas with removable tape. Recheck them later, but do not treat the outline as a map of the buried pipe.
Prepare for a valid water-meter test
For the initial test, stop every intentional and automatic water use while normally leaving the main water supply open. If the main valve between the meter and the suspected plumbing is closed first, downstream leakage cannot register at the meter.
Use this checklist:
- Close faucets, shower valves, and hose bibbs.
- Stop dishwashers and washing machines.
- Do not flush toilets; listen for tanks that refill without use.
- Turn irrigation off at the controller and verify that no zone is running.
- Prevent the refrigerator ice maker from filling.
- Account for water-softener or filtration regeneration.
- Stop automatic humidifiers.
- Stop automatic pool and spa filling.
- Account for recirculation, boiler, hydronic, or other water-connected equipment.
- Tell everyone in the home not to use water.
- Record any device that cannot be disabled or whose status is uncertain.
“Everything is off” must include equipment that cycles automatically. A running toilet, scheduled softener, irrigation valve, or ice maker can create meter movement that resembles a concealed leak.
Inspect accessible plumbing before blaming a buried line. Look under sinks and around toilets, check appliance hoses and valves, inspect the water-heater area, and examine accessible exterior piping and the visible route between the meter and house.
Branch tests depend on valves that are correctly identified and that close fully. If a valve is corroded, leaking, inaccessible, mislabeled, difficult to operate, or of uncertain purpose, do not use it for diagnosis; ask a plumber to perform the isolation instead. A valve that appears closed but continues passing water can produce a false conclusion.
Distinguish diagnostic conditions from damage control:
- For a controlled meter test: stop fixtures and automatic users while the main normally remains open.
- For active, spreading leakage: close the main when it is safe to reach and operate, then prioritize professional assistance over continued testing. Commercial leak-safety guidance likewise recommends shutting off the main and avoiding affected areas when a steady hidden leak is causing active damage while help is arranged.
Do not use a universal test duration. The available evidence does not establish one valid duration for every meter, system, and leak rate.
Identify what your meter displays before interpreting it. Depending on the model, it may have mechanical dials, a small flow indicator, changing digital numbers, or an electronic status display. Follow the water utility’s access instructions and restrictions. If the box or meter cannot be reached safely, stop rather than tampering with utility-owned equipment.
Use the water meter to confirm unexplained flow
Perform the test methodically:
- Stop all known water use. Complete the checklist and establish a no-use period.
- Locate the meter. It may be in an exterior box, basement, utility area, or another location.
- Record the initial state. Write down the complete reading and photograph the display.
- Observe the flow indicator. Look for a moving sweep hand, rotating leak indicator, changing digits, or the meter’s equivalent flow display.
- Maintain the no-use condition. Do not flush, open a faucet, run an appliance, or allow scheduled equipment to operate.
- Record the final state. Photograph the meter from the same angle and compare the complete reading.
- Repeat an uncertain result. First check for overlooked users and automatic cycles.
A moving dial, active leak indicator, or increasing reading means water is flowing somewhere downstream of the meter when no use is intended. Aztec Plumbing’s published procedure similarly tells homeowners to stop appliances, toilets, and sprinklers before checking whether the meter indicator or numbers continue to move during a no-use test.
That result does not prove the leak is beneath the slab or identify where flooring should be removed. Possible sources still include toilets, appliance connections, irrigation, exterior piping, a service pipe, and concealed lines elsewhere in the building.
If the meter moves:
- Recheck every toilet for intermittent filling.
- Verify that irrigation is inactive.
- Check ice makers, softeners, filters, humidifiers, and pool equipment.
- Inspect the water heater and visible appliance connections.
- Confirm that nobody used water during the test.
- Repeat the observation under controlled conditions.
- Continue to branch isolation only when the relevant valves are known and functional.
If the meter does not move but moisture remains, the leak may be intermittent or too slow to show during that observation. The event may also have stopped, leaving residual moisture. Alternatively, the source may be a drain, rain, groundwater, condensation, or another non-metered source.
Keep a test log:
| Field | Record |
|---|---|
| Date and time | |
| Initial meter reading | |
| Final meter reading | |
| Indicator movement | None / intermittent / continuous |
| No-use interval | |
| Known water users disabled | |
| Users that could not be disabled | |
| Main-valve position | |
| Irrigation-valve position | |
| Water-heater inlet position | |
| Damp, warm, noisy, or damaged areas | |
| Pressure or water-heater symptoms | |
| Photographs taken | Yes / no |
When finished, replace the meter cover only if the utility permits customer access and it can be done safely. Do not remove seals or operate components the utility reserves for its personnel.
Narrow the leak with branch-isolation tests
Branch isolation identifies which section remains pressurized when unexplained meter movement occurs. It does not identify the exact point of failure.
Make one valve change at a time, note the original position, and observe the meter response. Use only valves you can positively identify and that operate normally.
| Valve action | Meter result | What the result suggests | What it cannot prove |
|---|---|---|---|
| Close a correctly identified irrigation isolation valve | Movement stops | The irrigation branch becomes the leading suspect | The failed valve, fitting, or underground point |
| Close the irrigation valve | Movement continues | The isolated branch is less likely responsible | That irrigation is sound if the valve passes water or has another feed |
| Close a verified whole-house shutoff fully | Movement stops | Flow is probably within the household system downstream of that valve | That the leak is under the slab |
| Close a verified whole-house shutoff fully | Movement continues | Piping between the meter and house valve may be involved | A service-pipe leak if the valve passes water, a bypass exists, or the layout is misunderstood |
| Reopen the house supply and have the water-heater cold inlet isolated under appropriate professional or appliance-specific procedures | Movement stops | The hot-water system is implicated | That the failure is under the slab or at a particular floor location |
| Isolate the water-heater inlet | Movement continues | A continuously leaking hot-water branch becomes less likely | That every hot-water component is sound or another leak is absent |
A Twin Home Experts contractor video demonstrates using house, irrigation, and water-heater valves to narrow unexplained meter flow. Its conclusions depend on accessible, correctly identified valves that actually close, and the demonstration does not locate the precise break in the shown branch-isolation sequence.
Interpret continued meter movement after closing the house shutoff cautiously. The service piping between the meter and that valve becomes a reasonable suspect only if:
- The correct whole-house valve was operated.
- The valve fully isolated the house.
- No bypass exists.
- No irrigation, outbuilding, fire line, or other branch tees off before it.
- The property does not have an unrecognized shared service.
- The meter serves only the property being tested.
- The assumed plumbing layout is correct.
The water-heater test requires additional restraint. Closing the cold inlet may implicate the hot-water system if meter movement stops reproducibly, but it does not prove an under-slab failure. Follow the appliance instructions and have a plumber perform this test when the valve arrangement, heater status, or safe operating procedure is uncertain.
After a valve test, restore it to its documented starting position and confirm that normal service has returned. Stop testing if a valve leaks, binds, cannot be identified, or does not appear to isolate the expected branch. Professional isolation is preferable when the plumbing layout is unknown or the valves are inaccessible, shared, mislabeled, corroded, or inoperable.
Map the likely area without breaking the floor
Once a branch has been narrowed, map observations rather than choosing an excavation point.
Walk through the relevant rooms and record:
- Damp or discolored flooring.
- Warped, loose, or lifted finishes.
- Musty areas.
- Locations where water sounds are strongest.
- Warm or cool floor zones.
- The water heater, manifolds, fixtures, and known pipe entries.
- Previous plumbing or slab repairs.
- Interior and exterior shutoff valves.
- Changes over time.
For a suspected hot-water branch, compare temperatures along plausible routes between the water heater and fixtures. Make measurements under similar conditions, accounting for sunlight, ovens, refrigerators, dishwashers, HVAC ducts, radiant heating, electrical equipment, and repaired concrete.
An infrared thermometer measures a spot; a consumer thermal camera displays surface-temperature patterns. Either may help identify a room or general zone, particularly when a hot-water leak has warmed nearby material. In a contractor-produced demonstration, infrared imaging was explicitly treated as an initial clue before pipe tracing and acoustic listening rather than conclusive proof.
A moisture meter answers a different question: whether the tested material is damp or comparatively moist. It may help map the affected area, but it does not identify the failed pipe, distinguish every possible moisture source, or show where migrating water began.
Quiet listening can help screen the area:
- Stop intentional water use.
- Turn off avoidable background noise.
- Listen near known pipe entries and along suspected routes.
- Compare several locations instead of relying on one sound.
- Note whether the sound changes when a branch is isolated.
Hissing or whooshing can be associated with escaping pressurized water, but sound may travel through piping and building materials.
Do not use a household stethoscope reading as an instruction to break concrete. Professional acoustic work compares signals along a known or traced route and filters unrelated noise.
Plans and visible plumbing can improve the map. Review renovation records, manifolds, fixture groups, the water-heater location, and known pipe entries. Sketch likely routes, but label them as assumptions: buried plumbing may cross rooms unexpectedly or differ from drawings after earlier repairs.
A cold-water leak may have no useful thermal signature. If meter and valve results implicate a cold branch, pipe tracing, pressure isolation, and acoustic comparison become more important.
Do not drill exploratory holes, break concrete, inject compressed air, or introduce tracer gas as a homeowner locating method. The available practitioner evidence describes air and tracer gas only as specialist techniques and does not provide a universally safe homeowner procedure, pressure limits, or suitability criteria.
How professionals pinpoint and confirm the repair area
A competent investigation should progress from broad confirmation to focused testing:
- Review symptoms, photographs, meter readings, and valve results.
- Verify that unexplained flow is active and reproducible.
- Confirm the suspected branch and valve integrity.
- Trace or otherwise establish the buried pipe route.
- Scan for thermal and moisture anomalies.
- Compare acoustic readings along the route.
- Isolate or pressure-test sections when necessary.
- Reconcile the findings and mark a likely repair area.
- Confirm the opening point before destructive access.
The order may vary, but every tool should answer a defined question.
Pipe-route tracing establishes where the buried line probably runs. This gives context to later sound and temperature readings. A strong sound away from the expected route may be transmitted noise, while a thermal pattern following a traced hot line may deserve closer investigation.
Acoustic detection compares vibrations created as pressurized water escapes. A technician moves sensors along the mapped route and looks for the strongest relevant, repeatable signal. Results vary with pressure, opening size, pipe material, depth, building materials, and background noise. Rainaldi Home Services therefore describes the output as a likely repair point requiring trained interpretation and confirmation, not a guaranteed exact location in its acoustic-detection explanation.
Infrared imaging maps surface-temperature differences. It can be a useful starting point for some hot-water leaks when the pattern overlaps a traced hot line. It does not image the leak itself, and unrelated heat sources can mislead. Cold-water leakage may produce a weak, variable, or absent pattern.
Moisture mapping identifies wet or comparatively damp material. It can reveal migration beyond a visible stain, but it cannot by itself distinguish supply leakage from drainage, condensation, or exterior water. The wettest point need not be above the failure.
Pressure testing and zone isolation determine whether a selected section holds pressure. They can identify or narrow a leaking section even when the precise opening remains unknown. A pressure result should therefore support the diagnosis of a zone, not be presented as independent proof of the proposed floor opening.
Camera inspection is situational. Cameras can help in accessible cavities and certain drain or sewer investigations. They are not a universal answer for small pressurized supply lines, which may not accept a typical camera or provide a useful internal view.
Some specialists use controlled air or tracer gas in selected cases. Suitability depends on the line, location, pipe condition, equipment, and operator. These remain specialist methods because the supplied evidence does not establish safe homeowner procedures.
The standard before demolition is evidence convergence. A proposed opening point is stronger when supported by several compatible findings:
- Reproducible unexplained meter flow.
- Reliable isolation of the affected branch.
- A traced pipe route through the suspect area.
- A thermal or moisture pattern consistent with that route.
- The strongest relevant acoustic signal near the same location.
- A pressure result consistent with the suspected zone.
Contradictions should pause the project. If the strongest sound is far from the traced pipe, or a warm area corresponds to a duct rather than plumbing, the discrepancy needs an explanation.
No independent accuracy rate is supplied for these methods. Contractor demonstrations show how tools may be combined, but a result achieved in one property should not be generalized into a distance guarantee.
Know when to stop testing and what to ask before demolition
Stop homeowner testing and move to damage control if you encounter:
- Uncontrolled or visibly increasing water loss.
- Moisture spreading rapidly through floors or walls.
- Water near outlets, wiring, panels, appliances, or energized equipment.
- Buckled, soft, slippery, or otherwise unsafe flooring.
- Notable new material displacement or structural change.
- A valve that begins leaking or cannot be returned to service.
For an actively damaging hidden leak, shut off the main supply when it is safe to reach and operate, avoid electrically affected areas, and arrange urgent licensed assistance. Do not enter standing water near energized equipment or attempt to reach a panel through a wet area. General professional guidance likewise emphasizes electrical caution when water creates a hazard during leak investigation.
If conditions are stable, the meter confirms unexplained flow, and visible inspections and safe branch checks do not reveal the location, hire a plumber or leak-detection specialist experienced with pressurized under-slab supply lines.
Before authorizing the visit, ask:
- Is local licensing required, and does the provider hold it?
- Does the provider regularly locate pressurized supply leaks beneath slabs?
- Is the appointment for detection, repair, or both?
- Are detection and repair separate charges?
- Which tools are likely to be used?
- Will the buried pipe route be traced?
- How will the marked opening point be confirmed?
- Will you receive photographs, readings, a marked location, or a written report?
- Will the report identify uncertainty or alternative locations?
- What happens if the first opening misses?
- Are flooring removal, concrete access, and restoration included?
- What warranties apply to detection, plumbing repair, and restoration?
- Will water service and operated valves be checked before departure?
Seek a second method or independent opinion before destructive work when:
- The meter result cannot be reproduced.
- Valves do not fully isolate the expected branches.
- The plumbing layout remains uncertain.
- Thermal and acoustic findings point to different locations.
- The marked point does not align with the traced route.
- Surface moisture has migrated widely.
- The recommendation relies on one consumer-style instrument.
- The proposed opening is large or highly disruptive.
- Nobody can explain what happens if the first location is wrong.
After diagnosis, possible repair approaches include direct access and spot repair, rerouting or repiping the affected run, lining in selected circumstances, tunneling, or another trenchless method. Benjamin Franklin Plumbing’s overview lists several such approaches, but the appropriate choice depends on the confirmed location, pipe material and condition, access, layout, and on-site assessment rather than symptoms alone.
Do not approve whole-house repiping merely because the meter moves or a floor is warm. Obtain a written local evaluation that separates detection, plumbing work, access, permits where applicable, concrete restoration, flooring, and finish repairs.
Frequently asked questions
Does a moving water meter prove that the leak is under the slab?
No. With intentional and automatic water users stopped and the main supply open, continued meter movement indicates flow somewhere downstream of the meter.
The cause could be a running toilet, appliance, irrigation branch, exterior line, service pipe, concealed wall pipe, or under-slab pipe. Inspection and valve isolation can narrow the system, but professional localization is normally needed before choosing where to open the floor.
Should the main water valve be open or closed during a meter test?
For the initial controlled meter test, the main normally remains open while faucets, toilets, irrigation, appliances, and automatic water users are stopped. Closing the main first would prevent downstream leakage from registering.
Close the main for damage control if water is spreading or creating unsafe conditions. It may also be closed deliberately during a later branch-isolation test when the valve is correctly identified and functional.
Does a warm floor pinpoint a hot-water leak?
No. A warm floor can strengthen suspicion of a hot-water leak when it follows a plausible hot-water route and agrees with meter and isolation results. It does not establish where the pipe failed.
Heat spreads through concrete, and sunlight, appliances, ducts, heating equipment, or previous repairs can create similar patterns. Cold-water leaks may provide no warm-floor clue.
Can a thermal camera, moisture meter, or stethoscope tell me where to break the concrete?
Not reliably on its own.
- A thermal camera maps surface-temperature differences.
- A moisture meter identifies damp material.
- A stethoscope or acoustic device detects sound or vibration that may travel through pipes and building materials.
Each can help define a suspect area. None should independently determine an excavation point.
How is a suspected slab-leak location confirmed before demolition?
Confirmation comes from compatible findings rather than one instrument. A defensible opening point may combine reproducible meter flow, reliable branch isolation, a traced pipe route, thermal or moisture mapping, comparative acoustic readings, and pressure or zone testing.
If those findings conflict, testing should continue or a second opinion should be obtained before materials are removed.
The practical rule is: confirm unexplained flow at the meter, narrow the affected branch through inspection and functional valves, and require converging professional evidence before opening any floor or concrete.
Homeowners can gather strong diagnostic clues, but exact under-slab localization is usually a specialized task. If water is spreading or approaching electricity, stop testing, shut off the supply when safe, avoid the affected area, and obtain urgent licensed help.