
Essential Guide to Basement Floor Drainage Systems for Dry Homeowners
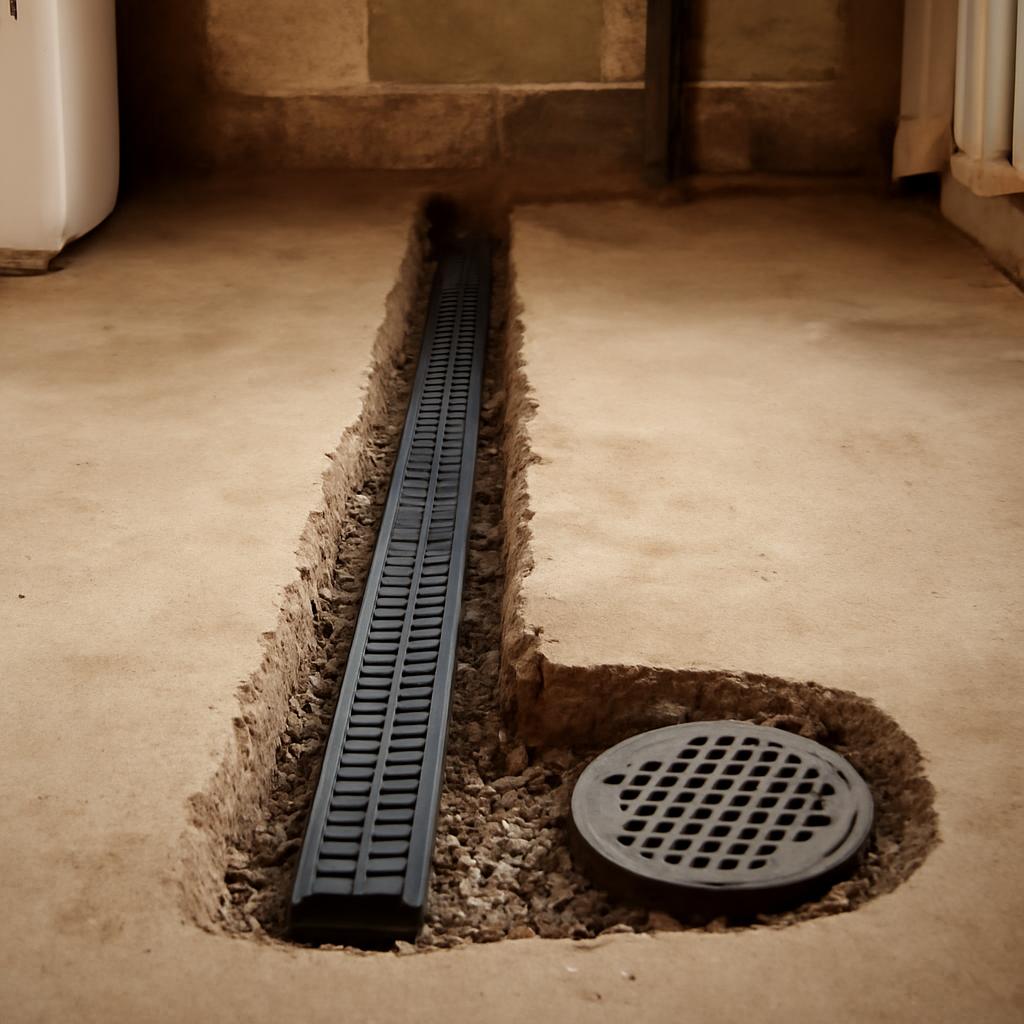
Point drains handle appliance spills. Interior perimeter drains route chronic wall-floor seepage to a sump. Sewer odor can come from a dry trap or blockage.
A basement floor drainage system is not a single product. Depending on the problem, it might mean a simple floor drain for appliance spills, a trench or channel drain at an entry, an interior perimeter drain under the slab, or a groundwater-control system that feeds a sump pump. The right fix starts with the water source: seepage at the wall-floor joint, water moving through block walls, surface spills, or a plumbing backup do not all call for the same solution. Broad overviews from Family Handyman and United Waterproofing NJ both make that distinction.
For many chronically wet basements, the core system is an interior perimeter drain that captures water where the wall meets the slab and routes it to a sump basin. But not every damp basement needs slab cutting. Exterior grading and gutter problems can overload any interior system, sewer odor can come from a dry trap rather than groundwater seepage, and older homes may have drainage connections or discharge rules that vary by local code. Family Handyman’s installation guide, and United Waterproofing NJ all support a diagnose-first approach.
This guide is general homeowner information. Local plumbing, building, electrical, and discharge rules control the final design in your municipality.
Signs Your Basement Needs a Floor Drainage System
Most basement water problems announce themselves before they become a full flood. Common warning signs include water stains, white efflorescence, musty or moldy odors, standing water after rain, high humidity, and visible cracks in basement walls or floors. Those symptoms point to moisture moving through or around concrete rather than simply appearing out of nowhere. Family Handyman and Drains Unlimited both list those as common reasons homeowners start investigating basement drainage.
Where the symptoms show up matters almost as much as the symptoms themselves. Dampness concentrated around the perimeter—especially at the cove joint, where the wall meets the floor—often suggests groundwater seepage or pressure at the slab edge. By contrast, water limited to a washer, utility sink, water heater, or exterior door is more likely a surface-water collection problem. United Structural Systems and United Waterproofing NJ both distinguish surface-water drains from footing or perimeter drainage systems.
Bad smells are another place homeowners misdiagnose the problem. A sewer odor coming from a basement floor drain does not automatically mean the basement needs waterproofing. Floor drains use a water-filled trap to block sewer gases, and odor can appear when that trap dries out or when a partial blockage traps air. Gurgling can also point to drain or vent issues. John Sewer explains the trap function, and DrainFinder’s general drain-triage guidance notes that sewer smells and gurgling are often trap or vent issues rather than simple groundwater problems.
Some symptoms should push you away from “basement drainage” thinking and toward broader plumbing or site diagnosis. If two or more fixtures drain slowly at the same time, or if sewage backs up into a second fixture, that suggests a larger drain-line problem rather than a single clogged floor drain. Separately, if you notice water appearing near the foundation while you are doing drain-clearing work, treat that as a stop sign rather than a diagnosis; it can indicate a larger sewer, site-drainage, or groundwater problem that needs professional evaluation. DrainFinder presents those as general residential escalation signs.
A practical symptom map looks like this:
- Musty odor + efflorescence + damp perimeter: often consistent with seepage or groundwater pressure at the wall-floor joint.
- Water only after appliance use, wash-down, or spills: more consistent with a surface drain need than a perimeter waterproofing system. United Structural Systems
- Sewer odor without flooding: check the floor-drain trap and blockage symptoms before assuming waterproofing failure.
- Several drains slowing together or backup into another fixture: treat as likely main-line triage, not a simple floor-drain issue.
Before you jump to interior trenching, also look outside. Short downspouts, overflowing gutters, and poor grading can create “wet basement” symptoms that overwhelm any interior drain. That exterior-first check shows up repeatedly in the stronger sources and is covered in detail later in this guide. Family Handyman
Common Types of Basement Floor Drainage Systems
Homeowners often use the phrase basement floor drainage system as if it describes one standard setup. In practice, several different systems fall under that label.
French drains and curtain drains
A French drain uses perforated pipe buried in gravel to intercept groundwater. In basement contexts, it is commonly installed along the interior perimeter near the wall or footing. Family Handyman describes French drains as perforated pipe in gravel, typically 6 to 24 inches deep, used to manage groundwater. A curtain drain is a shallower variation often used for seepage near walls. These systems are aimed at groundwater and pressure relief, not everyday mop water.
French Drain Inside a Basement: How Interior Perimeter Drains Work
Standard floor drains or point drains
A standard floor drain or point drain is the familiar grated opening set at a low spot in the slab. It is best for surface spills, appliance leaks, and incidental water. When part of a plumbing system, it typically needs a P-trap to block sewer gases, and Family Handyman notes that plumbing-connected floor drains also require venting in those configurations. Depending on the design and local code, a point drain may route into a plumbing drain path or into a sump-related collection layout.
Channel drains or trench drains
A channel drain or trench drain is a long, narrow grated drain suited to places where water moves across a wider area instead of pooling at one spot. Typical uses include basement entry doors, utility spaces, or wide work areas. These drains work best when the surrounding slab slopes toward the channel. Basement Systems
Subfloor, footing, or interior perimeter drains
These are the systems most homeowners mean when they talk about drainage for a wet basement. An interior perimeter drain sits beneath the slab along the wall or footing area, collects water before it spreads across the floor, and commonly directs it to a sump basin.
Baseboard-style or interior channel retrofits
There is also a retrofit category of interior channels mounted at or near the wall-floor joint rather than in a full traditional trench. These are marketed especially for monolithic slabs or finished basements where full trenching is less practical. Basement Systems and Waterproof.com describe these approaches, but the available support in this evidence set is mainly manufacturer-led, so they should be treated as vendor-described options rather than the best-established default.
Here is the clearest way to compare the main types:
| System type | Best for | Main limit | Install character |
|---|---|---|---|
| French or curtain drain | Groundwater interception and perimeter seepage | Not a simple fix for isolated spills or plumbing backups | Gravel trench with perforated pipe; more invasive than a point drain. |
| Standard floor drain / point drain | Appliance leaks, surface spills, localized water collection | Does not relieve under-slab pressure across the whole basement | Localized floor drain at low point; may involve plumbing trap/vent requirements. |
| Channel / trench drain | Wide water path at entries or utility zones | Usually needs slab sloped toward the channel | Surface or recessed linear drain. |
| Interior perimeter / footing drain | Chronic seepage at wall-floor joint, under-slab water pressure | Requires slab cutting and sump integration in many homes | Under-slab perimeter system feeding sump or gravity outlet where feasible. United Waterproofing NJ |
| Baseboard-style interior channel | Some monolithic-slab or lower-demolition retrofit cases | Evidence here is mostly manufacturer marketing, not independent testing | Lower-demolition retrofit concept at wall base. Waterproof.com |
A useful rule of thumb:
- Groundwater seepage or cove-joint leakage: interior perimeter or French-drain-type system.
- Surface spills or appliance leaks: point drain.
- Wide doorway or utility area: trench or channel drain.
- Monolithic slab or demolition-sensitive retrofit: a wall-base channel may be considered, but treat product claims cautiously and compare them against your slab type and water path.
How Interior Perimeter Drainage Systems Work
An interior perimeter drainage system is built to catch water where it first reaches the basement, not after it has already spread to the middle of the floor. In many homes, that first entry point is the cove joint where the slab meets the foundation wall. Water can also move through wall cracks, tie holes, or, in concrete block foundations, through water-filled wall cores. Applied Technologies and United Waterproofing NJ both describe capture at the wall-floor joint and redirection to a sump system.
The typical assembly is simple in concept even if it is disruptive in practice. A strip of the slab is removed along the perimeter, a trench is opened down to the footing area, and 4-inch perforated pipe or drain tile is laid in washed stone. Water entering from the wall-floor joint or from below the slab moves into that gravel and pipe, then flows to a sump basin or, where site conditions allow, a gravity outlet. Applied Technologies
What makes the system effective is pressure relief. As groundwater builds outside the foundation, it creates hydrostatic pressure that can force water through cracks or up at the slab edge. An interior perimeter trench gives that water an easier path into the drain system before it reaches the floor surface. Oriole Basement Waterproofing and Gamcon both frame interior French drains as hydrostatic-pressure relief systems.
Concrete block walls need special attention because the hollow cores can hold water. In some installations, holes are drilled in the bottom course of block so trapped wall water can drain into the perimeter trench. That detail appears in Family Handyman’s installation guide and in Applied Technologies’ interior-drainage material. It should be understood as one installation method used in some block-wall systems, not a universal requirement for every basement.
Some manufacturers describe less disruptive variants that place a formed interior channel at the wall base instead of cutting a full traditional trench. The concept is to collect seepage at the joint and route it to a sump with less slab demolition. That may be relevant in monolithic slabs or finished spaces, but the evidence in this set is mostly vendor description rather than neutral comparative testing. Waterproof.com
The key distinction is this: an interior perimeter system does not truly waterproof the outside of the foundation. It manages water that has reached the wall-floor interface and moves it to a controlled discharge point. That is why exterior drainage, grading, and roof runoff still matter even when an interior system is installed.
Sump Pumps: The Active Component of Drainage Systems
If the perimeter drain is the collector, the sump pump is the active component that makes the whole system work in many basements. Foundation drains under the basement floor collect groundwater and direct it to a sump pit, where the pump ejects the water away from the house.
Discharge location matters. MMSD says the sump discharge pipe should terminate at least 6 to 10 feet from the house. That distance helps prevent the pumped water from re-entering the soil right beside the foundation. A contractor article from Oriole Basement Waterproofing gives similar advice, recommending at least 10 feet from the foundation.
Older homes add a code-history wrinkle. In MMSD’s jurisdiction, homes built before roughly 1954 often had foundation drains connected to the sanitary sewer through a Palmer valve, while later homes were required to route foundation drainage to a sump pump instead. That rule history is local, not universal, but it is a good reminder not to assume an older basement is plumbed like a newer one.
Testing a sump pump is straightforward: pour water into the basin and confirm that the float rises and the pump activates before the pit overflows. MMSD gives that exact homeowner test.
Common warning signs include:
- Runs nonstop
- Never turns on
- Cycles too often
- Sounds unusually loud
Those symptoms are listed in MMSD’s troubleshooting guidance.
If your basement depends on a pump, it should also have an outage plan. MMSD discusses battery, water-powered, and generator backup options, each with tradeoffs such as limited runtime, dependency on municipal water pressure, or maintenance and fuel requirements. That is the practical reason many wet-basement professionals describe the real system as interior drain plus sump pump, not one or the other.
One more code caution: in MMSD’s jurisdiction, it is illegal to drain a sump pump into a basement floor drain or wash tub. That legality is local, but it illustrates why sump discharge routing should always be verified with your local plumbing or building official rather than copied from another house.
Installation Basics and DIY Thresholds
The most important installation step often happens before any concrete is cut: reduce the amount of water reaching the foundation. Family Handyman says to correct exterior grading, gutters, and similar drainage defects first. United Waterproofing NJ makes the same basic point from the waterproofing side: interior systems manage water that arrives; they do not eliminate exterior water loading by themselves.
For a conventional interior perimeter drain, the usual sequence is:
- Cut and remove a strip of slab roughly 16 to 18 inches from the wall.
- Dig to the bottom of the footing, but not below it.
- Install a sump basin, often about 30 to 36 inches deep.
- Lay 4-inch perforated pipe in washed stone and route it toward the basin.
- Patch the slab and restore finishes.
Finished basements complicate the work. Family Handyman advises leaving 4 x 4-inch concrete support sections every 6 feet under finished basement walls during the process, then patching them later. That detail captures why this is not just a “plumbing job.” It can affect framing support, finish materials, dust control, and restoration planning.
There is also an indoor-air and safety consideration. Slab cutting can create a new pathway for soil gases, which is why Family Handyman specifically recommends testing for radon before installing a below-slab drainage system.
Before work starts, verify a short code-and-scope checklist:
- Permit and inspection requirements with the local building official.
- Electrical requirements for the sump pump, including whether a dedicated outlet or circuit is required.
- Legal discharge location for the sump line and the minimum separation from the house.
- Whether a plumbing-connected floor drain needs a trap and vent in your configuration.
- Whether sewer tie-ins are allowed at all for the kind of water you are collecting.
What is realistic for DIY? Small maintenance tasks usually are:
- refilling a dry floor-drain trap with water
- clearing debris from an accessible grate,
- testing a sump pump by adding water to the basin
- cleaning a simple localized clog near the drain opening.
A full perimeter install is different. Even the DIY-oriented Family Handyman guide presents it as multi-day concrete cutting and trenching work. Oriole Basement Waterproofing adds why pros push homeowners away from DIY: poor slope, digging mistakes near the footing, and assembly errors can leave you with standing water or structural damage instead of a dry basement.
For general residential drain troubleshooting, DrainFinder suggests a clear stop point: if a snake hits resistance past 25 feet, if sewage backs up into a second fixture, or if water appears near the foundation, stop DIY work and escalate. That is general drain-clog triage, not a basement-drainage design rule, but it is a useful homeowner cutoff when the problem is obviously getting larger than an accessible local clog.
One more safety line from MMSD is worth keeping in mind: if there is standing water around the sump pump or electrical fixtures, do not keep troubleshooting in place—call a professional.
Matching Systems to Your Basement Type
The right basement floor drainage system depends on five variables: water source, slab type, foundation type, finish level, and discharge strategy.
If you have a poured concrete foundation with a conventional footing, the standard approach is often an under-slab perimeter trench with perforated pipe feeding a sump basin. That is the classic layout described in Family Handyman and United Waterproofing NJ because it directly addresses seepage at the wall-floor joint and under-slab pressure.
If you have a monolithic slab, footing-area trenching may not work in the same way because the slab and footing are poured together. In those cases, manufacturers market baseboard-style interior channels that collect water at the wall-floor joint with less demolition. Basement Systems specifically identifies monolithic floors as a distinct use case. Because the support here is vendor-led, it is best to treat these products as possible design options that need local evaluation, not as universally proven replacements for traditional perimeter drains.
If the problem is groundwater seepage or hydrostatic pressure, you are generally in perimeter-drain territory: French drain, footing drain, or interior perimeter system tied to a sump. If the problem is surface water from a doorway, wash area, or occasional appliance spill, a point drain or channel drain may be the better fit.
Concrete block foundations deserve their own category. Because block cores can hold water, some interior systems include a way to let wall water drain at the base rather than stay trapped inside the block. Both Family Handyman and Applied Technologies describe drilling holes in the bottom course in some installations.
Finished basements shift the tradeoff. Traditional trenching may still be the right answer, but it brings more demolition, dust, and restoration work. Lower-disruption channels are often marketed for this scenario, particularly for monolithic slabs or spaces where keeping finishes intact matters. Again, the support in this evidence set is mainly manufacturer description, so it is best used as a discussion point with a qualified installer rather than as settled best practice.
Site conditions matter too. In low-lying lots, poorly draining soil, or areas with a high water table, passive collection alone is less reassuring than a sump-integrated system with a good discharge path and backup plan.
A compact decision guide:
- Poured footing + chronic perimeter seepage: standard interior perimeter trench.
- Monolithic slab + wall-base seepage: consider wall-base channel options, recognizing the evidence is largely manufacturer-led.
- Localized spill risk: point drain.
- Broad entry or utility wash area: trench/channel drain.
- Block wall with water in cores: perimeter collection plus block-base drainage detail may be needed.
Maintenance and Troubleshooting for Longevity
Even a well-designed drainage system needs upkeep. The simple maintenance items are usually the ones that prevent the ugly failures later.
For standard floor drains and grates, keep lint, sediment, and debris from building up at the opening. One seller guide suggests cleaning on a 3- to 6-month interval, which is a reasonable starting point in basements that collect dust, pet hair, or washer lint, though heavier-use spaces may need more frequent checks. Drains Unlimited
For floor-drain traps, the basic maintenance task is keeping water in them. John Sewer recommends pouring water down the drain every few weeks because a dry trap is a common source of sewer odor.
For sump pumps, MMSD advises testing by adding water to the basin and confirming normal activation. It says to do this regularly, especially if you depend on the pump during storms. If you want a calendar habit, The Basement Guide uses quarterly testing as a homeowner benchmark, but the stronger point is simply not to wait until the next storm to find out the pump is dead.
Also inspect the discharge line. Make sure it is still connected, clear, and not terminating right beside the house. In cold climates, seasonal freezing is another failure point. A perfectly good sump pump cannot protect the basement if the discharge line is blocked or recycling water back to the foundation.
Watch for these recurring trouble signs:
- slow drainage
- standing water near the drain
- gurgling sounds
- sewer odors
- sump pump cycling too often or not running at all.
If the problem looks like a simple localized blockage, basic snaking may help. But repeated backup can signal larger issues, including root intrusion or a main sewer problem, and John Sewer notes that major sewer disruptions often affect the lowest drains first.
Humidity control is helpful, but secondary. Family Handyman recommends maintaining exterior drainage and using a dehumidifier as part of moisture control. Use the dehumidifier to handle residual dampness after liquid-water entry has been controlled, not as a substitute for drainage.
Do not neglect exterior maintenance either. Gutters, downspouts, and grading affect the load on every interior drain and pump.
Exterior Fixes Before Interior Drainage
Interior drainage is often the practical retrofit for an existing wet basement, but it should rarely be the first question. First ask why so much water is getting to the foundation at all.
The most common surface-water problems are poor grading, overflowing gutters, and downspouts that discharge too close to the house. Family Handyman explicitly says to correct those exterior conditions before installing an interior drainage system.
That is not just a budget-saving suggestion. It is a performance issue. An interior perimeter drain can manage water that reaches the wall-floor joint, but it does not keep roof runoff from saturating the soil against the foundation. United Waterproofing NJ is clear on that distinction: interior systems capture and redirect water that has already reached or entered the structure.
Exterior drainage systems have their own role. An exterior perimeter drain or exterior French drain intercepts water before it reaches the basement wall, and exterior waterproof coatings are intended to reduce penetration through the foundation itself.
The practical sequence is:
- If storm runoff is being directed toward the house, correct that first.
- If water still enters despite good exterior drainage, an interior perimeter system may be justified.
- If the lot is low, the soil drains poorly, or the water table is high, you may need both exterior improvements and an interior drain-to-sump system.
That order turns basement drainage into part of a larger water-management plan instead of a hidden interior system constantly compensating for preventable roof and grading mistakes.
Effective basement drainage is usually a sequence, not a product: diagnose the water source, reduce exterior loading, match the system to the slab and foundation, and stay realistic about DIY limits. That is the best path to solving seepage once instead of reopening concrete later.
Can I connect a basement floor drain to my sanitary sewer?
Do not assume you can. Connection rules are local-code questions, and groundwater-control systems are often treated differently from ordinary plumbing fixtures. In MMSD’s jurisdiction, older homes sometimes had foundation drains tied to the sanitary sewer through a Palmer valve, but later homes were required to route foundation drainage to a sump pump instead. MMSD also says it is illegal there to send sump discharge into a basement floor drain or wash tub.
A standard floor drain that is part of the plumbing system may be allowed only if it is designed as a proper plumbing fixture; Family Handyman notes that plumbing-connected floor drains require a trap and vent. But a new groundwater-control system should never be tied into the sanitary sewer based on guesswork. Check with your local plumbing or building official before changing any drainage connection.
Is DIY installation of a full perimeter drain safe?
Usually not for most homeowners. The work involves cutting concrete, trenching to the footing, installing a basin often 30 to 36 inches deep, laying pipe correctly, and restoring the slab. Family Handyman shows the sequence in detail, but it also makes clear that the job is heavy, dirty, and disruptive.
The bigger issue is failure mode. Oriole Basement Waterproofing warns that poor slope, clog-prone assembly, or digging mistakes near the footing can leave you with standing water or structural trouble instead of a fix.
As a separate general drain-troubleshooting rule, DrainFinder says to stop DIY work if a snake meets resistance past 25 feet, if sewage backs up into another fixture, or if water appears near the foundation. Those are escalation signs that the problem is likely beyond simple homeowner clearing.
What if my sump pump doesn’t activate?
Start with the basic test: pour water into the basin and see whether the float rises and the pump turns on before the pit overflows. MMSD recommends exactly that check.
Do not keep waiting while the pit fills. MMSD specifically says that if you have standing water around the sump pump or electrical fixtures, you should call a professional rather than trying to troubleshoot in unsafe conditions.
If outages are common where you live, add a backup plan. Battery, water-powered, and generator backups all exist, each with tradeoffs.
Do I need a permit for basement drainage work?
Family Handyman specifically advises checking with the local building official for permits and inspections before installing a basement drainage system.
That matters because the job can involve slab demolition, electrical work for the sump pump, changes to foundation-drain routing, and exterior discharge piping. Even if a contractor handles the work, do not assume the permitting answer is the same in every municipality.
How often should I test my sump pump?
At minimum, test it regularly and before heavy-rain periods by pouring water into the basin and confirming that it activates normally. That test method comes directly from MMSD.
If you want a routine, quarterly is a reasonable homeowner schedule used by The Basement Guide, but the more important rule is consistency. If your basement depends on a pump, do not wait for storm season to discover it has failed.