
How to Unclog a Sink Drain Safely, Step by Step
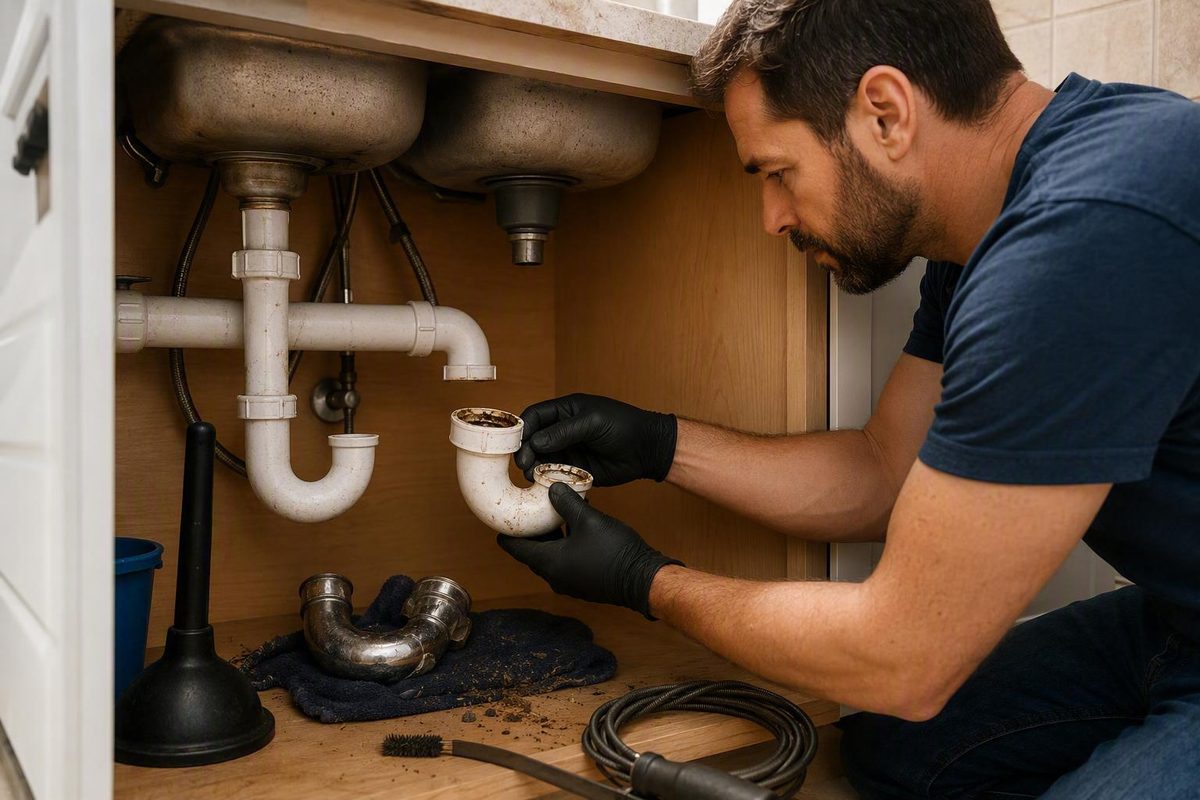
Remove debris. If plunging with a full seal fails, clean the P-trap. Incomplete activation has left dry baking-soda clumps that worsened the blockage.
Overview
To unclog a sink drain, first identify the likely type of buildup, remove anything reachable, then progress to a sealed plunger, P-trap cleaning, and a hand drain snake. Test the sink after each method. Stop when water drains normally without backing up and any plumbing connections you disturbed remain dry.
This sequence starts with accessible mechanical methods because they let you check the result before dismantling more plumbing or introducing chemicals. Kitchen blockages commonly involve food particles and grease, while bathroom clogs commonly involve hair, soap scum, toothpaste, and grooming residue, according to Kohler and Hiller Plumbing. These patterns guide your first step, but they do not prove what is hidden inside the pipe.
Escalate only when the previous method produces no meaningful improvement. If the sink does not drain at all, has a strong foul odor, remains blocked after several methods, or may have damaged plumbing, professional diagnosis is more appropriate than repeated blind attempts. A collapsed or damaged drain line may require equipment and expertise beyond ordinary sink tools, as Plumbing Zone notes.
Identify the likely clog and prepare the right path
Your goal is normal drainage without backup or leakage. Before touching the stopper or plumbing, observe how the sink behaves. Note whether it drains slowly or not at all, whether debris is visible near the stopper, and whether the problem is in a kitchen or bathroom sink. These observations help you choose an initial method without pretending to locate the obstruction precisely.
Gather only what the next method requires. Depending on the path, that may include a sink plunger, a wet cloth or stopper, rubber gloves, a narrow flexible barbed drain tool, a bucket, basic hand tools, or a hand drain snake. Do not dismantle the trap simply because it is available if reachable debris removal or plunging has not yet been tried.
Determine whether anyone has already added a commercial drain cleaner. Cleaner trapped in a blocked sink changes the exposure risk. The supplied evidence does not establish a universal procedure for safely plunging, opening the trap, or snaking a line that still contains cleaner. In that situation, pause and follow the product label or obtain appropriate professional guidance before beginning mechanical work.
Use symptoms to estimate how deep the blockage may be
Treat the symptoms as clues, not a definitive diagnosis. Visible hair or residue around a bathroom stopper supports starting at the drain opening. If a narrow barbed tool retrieves hair and the flow improves, that result supports the conclusion that at least part of the obstruction was near the stopper.
If nothing is reachable, the clog may still be local. A P-trap is the U-shaped pipe beneath the sink, and debris recovered from it provides direct evidence that material had collected there. Once the trap is cleaned and reinstalled, improved flow supports stopping the escalation.
Continued blockage after clearing the stopper area and trap raises the possibility that material lies farther into the drain line. It does not prove the hidden location or condition. A snake may reach deeper debris, but failure to restore drainage can also be consistent with plumbing that is damaged, collapsed, old, or poorly installed, possibilities identified by Kohler and Plumbing Zone.
A sink that does not drain at all warrants more caution than one that is merely slow. If local methods produce no change, repeated force does not establish that the pipe is clear. It is a signal to reassess before escalating further.
Match the first method to a kitchen or bathroom clog
In a kitchen sink, food particles and grease are common forms of buildup, according to Kohler. Begin by checking for accessible food debris, then use a properly sealed plunger if nothing can be removed by hand. Do not assume grease is the cause solely because the clog is in a kitchen.
Bathroom sinks more commonly collect hair, soap scum, toothpaste, and grooming residue, according to Hiller Plumbing. Hair can snag beneath the stopper, making direct removal with stopper access or a narrow barbed tool a useful first path. This is especially relevant when the stopper appears fixed.
The distinction changes priority, not the whole procedure. A kitchen clog can contain a solid object, and a bathroom blockage can extend past the trap. Use what you recover and how the flow changes as the evidence for your next decision.
Use this escalating DIY sequence
Use the least invasive supported method that fits the symptom, then test before moving forward:
- Remove hair, residue, or other debris you can reach at the stopper.
- Plunge while sealing every alternate air or water opening.
- Remove and clean the P-trap with a bucket underneath.
- Feed a hand drain snake into the line beyond the trap.
Each step needs its own result check. Stop as soon as normal drainage returns and any disturbed connection remains dry. If a step yields only partial improvement, reassess the symptom rather than automatically repeating every method.
Step 1: Remove reachable debris
Put on gloves and inspect the drain opening. Remove loose debris that is plainly accessible without forcing a tool into an unknown obstruction. In a bathroom sink, look particularly for hair or residue caught immediately below the stopper.
If the stopper lifts out normally, remove it and inspect beneath it. If it appears fixed, do not force it from above. A practical pathway documented by the Home Improvement Stack Exchange community is to disconnect accessible stopper linkage so the stopper can be removed, or to reach the drain through the trap. Only handle linkage you can identify and access without damaging it.
A long, narrow, flexible barbed drain tool is another supported option for a typical hair clog. Feed it through the drain opening, then withdraw it so snagged hair comes back out for disposal in the trash. The useful result is recovered material and visibly improved drainage. Do not push removed debris back down the drain.
Restore the stopper or linkage before testing if you disturbed it. Run water gradually and watch whether it clears the basin normally. If drainage improves but remains slow, inspect once more for reachable material. If nothing is reachable or there is no meaningful change, proceed to a sealed plunger.
This step is most useful for material near the drain opening. Failure does not establish that the blockage is deep, only that direct removal did not resolve it.
Step 2: Plunge with a sealed drain
Use a sink plunger, enough water to cover its rubber cup, and a wet cloth or stopper for any second opening. The water helps the cup stay engaged over the drain. Kohler specifically advises adding enough water to cover the rubber part of the plunger.
Before plunging, close alternate openings. On a bathroom sink, press a wet cloth firmly against the overflow opening. On a double kitchen sink, seal the second drain with a wet cloth or stopper, as advised by ATCOenergy. An open overflow or second basin gives pressure another route to escape, which can make plunging ineffective.
Center the plunger cup over the clogged drain. Press it down so the rim stays sealed against the sink surface, then work the handle up and down without lifting the cup away from the drain. The important part is maintaining the seal throughout the motion. If the cup slips, reposition it and re-establish the seal before continuing.
Remove the plunger and observe the water. Visible drainage or a clear improvement in flow means the pressure has shifted at least part of the blockage. Restore water gradually to see whether the improvement continues without the basin backing up.
If the sink remains blocked, first check the setup. Confirm that the plunger covered the drain completely and that the overflow or second basin stayed sealed. Correcting a lost pressure seal is more useful than applying greater force through an open system. If the seal was sound and drainage did not improve, move to P-trap access rather than repeating plunging indefinitely.
Do not use this procedure if commercial cleaner may still be sitting in the blocked line. The evidence pack does not support a universal post-chemical plunging method or establish how to prevent contaminated liquid from splashing back.
Step 3: Clean the P-trap
The P-trap is the U-shaped pipe beneath the sink. Access it when reachable-debris removal and correctly sealed plunging have not restored drainage. You need a bucket to contain the water and debris released when the trap comes off.
Clear the area beneath the sink and place the bucket directly under the U-shaped section. Hiller Plumbing advises positioning the bucket beneath the trap before loosening the slip nuts at both ends. Expect retained water to drain when the connections separate.
Loosen the accessible connections that hold the trap in place, supporting the trap as it comes free. Keep the bucket beneath it and empty the contents there. Inspect the removed section and clear collected debris. A small brush can be used to remove material from the accessible interior, a method also described in wikiHow’s sink-unclogging guide.
Inspect how the parts align before reassembly. Return the trap to the same position and reconnect it carefully without inventing a tightening value. The goal is a correctly seated connection that remains dry when water is restored, not maximum force.
Test gradually. Introduce a small flow of water while watching the trap and both disturbed connections. If water leaks, stop the test and correct the reassembly before adding more. Do not treat improved drainage as success while a trap connection is leaking.
If the connections remain dry, increase the flow and watch the basin. Normal drainage without backup indicates that cleaning or reseating the trap resolved the immediate problem. If debris was removed but the sink remains slow or blocked, the obstruction may extend beyond the trap. Reassemble the plumbing securely before deciding whether to use a drain snake.
If the trap cannot be removed with the accessible connections, parts appear damaged, or reassembly will not remain dry, stop. The supplied evidence does not support improvised fitting repairs or forceful removal.
Step 4: Use a drain snake for a deeper blockage
A hand drain snake is appropriate after the drain opening and P-trap have been checked but the sink still will not drain normally. It allows you to reach farther into the drain line than a barbed hair tool. Kohler describes a snake as especially useful after other methods fail or when a larger object may be present.
With the trap removed and a bucket still available for residual water, guide the snake cable into the drain line leading into the wall. Advance it while operating the tool’s handle as designed. Do not force the cable if its path is uncertain.
When you feel resistance, rotate the handle to work the cable against the obstruction or catch material, an action described by Kohler. Withdraw the cable carefully and remove any retrieved debris. If resistance changes but nothing comes back, that alone does not confirm that the clog has cleared.
Reassemble the trap before restoring water. Test slowly, checking both drainage and the connections you disturbed. Recovered material and normal flow are observable evidence of success.
If the snake advances but drainage does not return, do not assume it cleared the line. If it repeatedly stops, cannot be advanced safely, or produces no improvement after the local drain and trap have been cleared, move to troubleshooting. Damaged or poorly installed plumbing is among the possibilities that requires professional assessment, but the DIY results cannot identify that condition with certainty.
Handle hot water, homemade remedies, and drain cleaners cautiously
Hot water, baking soda and vinegar, and commercial drain cleaners should not be treated as interchangeable first steps. The supplied sources disagree about some household methods and do not provide universal compatibility rules. Mechanical methods offer clearer observable results, while heat and chemicals require additional decisions about materials, clog type, and exposure.
Hot water is not a universal first step
Some instructions recommend hot tap water for a sluggish drain, especially when grease is suspected. Wirecutter reports that hot water can sometimes help with grease-related blockage, but also presents the counterpoint that softened grease may move farther into the plumbing rather than leave the system.
Boiling water adds material risks. Wirecutter’s sourced guidance warns that it may damage acrylic sinks, potentially crack natural stone, and harm some plastic pipes or seals. It also notes that heat may not help when the clog is unrelated to grease.
The evidence supplied here does not establish safe temperatures for every sink surface, pipe material, seal, or connection. It therefore cannot support a universal temperature chart or a claim that boiling water is safe whenever a particular visible pipe appears to be metal. Hidden components may differ from the exposed section.
Verify the materials and applicable manufacturer guidance before using very hot or boiling water. If you cannot verify compatibility, use the supported mechanical sequence instead. Turn the water off if the sink begins backing up rather than continuing to add water to an already blocked basin.
Baking soda and vinegar have mixed support
Baking soda and vinegar are not established here as a reliable treatment for grease, hair, or soap clogs. One common recipe in wikiHow combines equal parts and allows the mixture to remain for 20 minutes, but that recipe is not independent evidence of optimal quantities, waiting time, or effectiveness against a particular clog type.
The supplied counterevidence is important. Wirecutter reports mixed professional assessments. Its excerpt explains that the reaction produces what is essentially saltwater and gas. The gas may help shift a minor obstruction, but a plunger provides a more direct pressure-based method. The same source describes cases where incomplete activation left dry baking-soda clumps that worsened the blockage.
A drain-cleaner manufacturer, Liquid-Plumr, says the combination may work over time on weaker clogs. Because that is a qualified manufacturer claim and the broader evidence is mixed, it should not be treated as proof that the remedy clears significant blockages.
The available evidence does not compare this mixture credibly against grease, hair, or soap buildup, and it does not establish an optimal recipe. If the sink is actively clogged, removing reachable material or using a sealed plunger gives you a clearer success signal. Avoid repeatedly adding powders and liquids when the drain is not carrying them away.
Commercial drain cleaners require label-led precautions
Treat the product label as the controlling instruction for cleaner selection, quantity, compatibility, use, and disposal. Do not combine instructions from different products or improvise a stronger mixture.
Many non-enzymatic liquid drain cleaners contain highly concentrated corrosive acidic or basic compounds, according to Poison Control. Wear goggles and rubber gloves, pour carefully and close to the drain to reduce splashing, close the container after use, and store it away from children. Never mix drain cleaners. Kohler warns that mixing products can cause dangerous chemical reactions.
Do not assume that a cleaner is compatible with every sink or pipe because it is sold for drains. The supplied evidence does not establish a product-by-product or material-by-material compatibility guide. Follow the label for the specific cleaner and installation rather than adopting an unrelated online recipe.
If a commercial cleaner has already been poured into a fully blocked sink and remains in the line, stop before plunging, removing the trap, or inserting a snake. Those actions could disturb retained liquid, and the current evidence does not establish a safe universal procedure for performing them after chemical use. Consult the product label and obtain appropriate professional guidance. Tell any plumber what was added so the chemical-filled line is not treated as an ordinary mechanical clog.
Poison Control guidance belongs beside actual exposure, not routine troubleshooting. If someone swallows drain cleaner, gets it on their skin, or inhales its fumes, seek exposure-specific help immediately. In the United States, Poison Control directs people to its online tool or the poison center at 1-800-222-1222. Outside the United States, use the appropriate local poison service. Follow the product’s first-aid label while obtaining that guidance.
Verify the drain is clear before moving on
Test after every major method so you do not dismantle more plumbing than necessary. Restore water gradually and observe both the basin and any components you handled.
Use this short check:
- Water leaves the basin without backing up.
- The flow remains improved as water continues to enter.
- The stopper operates correctly if its linkage was disturbed.
- The P-trap and its connections stay dry if they were removed.
If all applicable checks pass, stop. Normal drainage and dry connections are the success criteria. Do not continue to snake or add cleaner to a sink that is already draining normally.
Partial improvement needs interpretation. It may mean that you removed only part of the buildup, but it does not identify what remains or where it is. Recheck the last accessible area and confirm that the plunger seal or trap reassembly was correct before escalating.
If drainage improves but a trap connection leaks, the repair is not complete. Turn off the water and correct the connection before testing again. If the sink continues to back up after the stopper, plunger, and trap paths have been checked, assess the stopping signals rather than repeating every method automatically.
Troubleshoot failed attempts and know when to call a plumber
A failed attempt is useful when it tells you what to correct or whether to stop. Match the failure to the procedure you just performed:
- The plunger moves but produces no pressure effect: Confirm that the cup covers the drain and that the overflow or second basin is sealed.
- Nothing is reachable beneath the stopper: Move to sealed plunging rather than forcing a barbed tool farther into an uncertain path.
- The trap contains debris but drainage remains poor: Reassemble it, verify that it is dry, then consider a deeper obstruction.
- The snake meets resistance but restores no flow: Do not treat cable movement as proof that the line is clear.
- The sink does not drain at all or has a strong foul odor: Stop repeated experiments and seek professional diagnosis.
- Several supported methods fail: A deeper, damaged, collapsed, old, or poorly installed line becomes plausible, although DIY symptoms cannot confirm the cause.
Kohler identifies complete non-drainage, strong foul odor, and unsuccessful repeated methods as reasons to call a professional. Plumbing Zone adds that collapsed or damaged drain lines can require professional equipment and expertise.
Also stop if you cannot restore a dry P-trap connection, a component appears damaged, the snake cannot be advanced safely, or chemical cleaner remains in the line. These conditions create a different task from removing an ordinary reachable clog.
Worked example: a slow bathroom sink with a fixed stopper
Suppose a bathroom sink drains slowly and the stopper will not lift out. Hair and grooming residue are plausible causes, but begin with an observation rather than a conclusion.
First, inspect the opening. If the linkage is accessible and identifiable, disconnect it so the stopper can be removed, or use a narrow flexible barbed tool to retrieve hair through the opening. Restore the stopper mechanism and test the flow. If recovered hair is followed by normal drainage, stop.
If the flow remains slow, seal the overflow with a wet cloth and plunge without breaking the cup’s seal. Test again. If there is still no meaningful improvement, put a bucket under the P-trap, remove it through its accessible connections, and clear any collected material. Reassemble it, restore water gradually, and confirm that the connections remain dry.
Reserve the hand snake for blockage beyond the cleaned trap. If snaking does not restore flow, or the sink stops draining entirely, seek professional diagnosis instead of repeating the sequence blindly.
Prevent the next sink clog
Prevention means keeping common solids and fats out of the drain rather than relying on a recurring remedy. Install a sink strainer to catch material before it enters the pipe. Kohler identifies a garbage strainer as a way to reduce blockage risk.
Dispose of food scraps and recovered debris in the trash. Keep grease, cooking oil, and coffee grounds out of the kitchen drain. ATCOenergy specifically advises against putting bacon grease, coffee grounds, or oils down a kitchen drain.
In a bathroom, remove collected hair from the stopper area before it accumulates below the opening. A strainer or accessible hair-catching barrier can make that material easier to discard. These habits target supported clog sources without depending on an unsupported maintenance schedule, boiling-water routine, or homemade cleaning recipe.