
Locate a Buried Septic Tank Without Digging Up the Yard
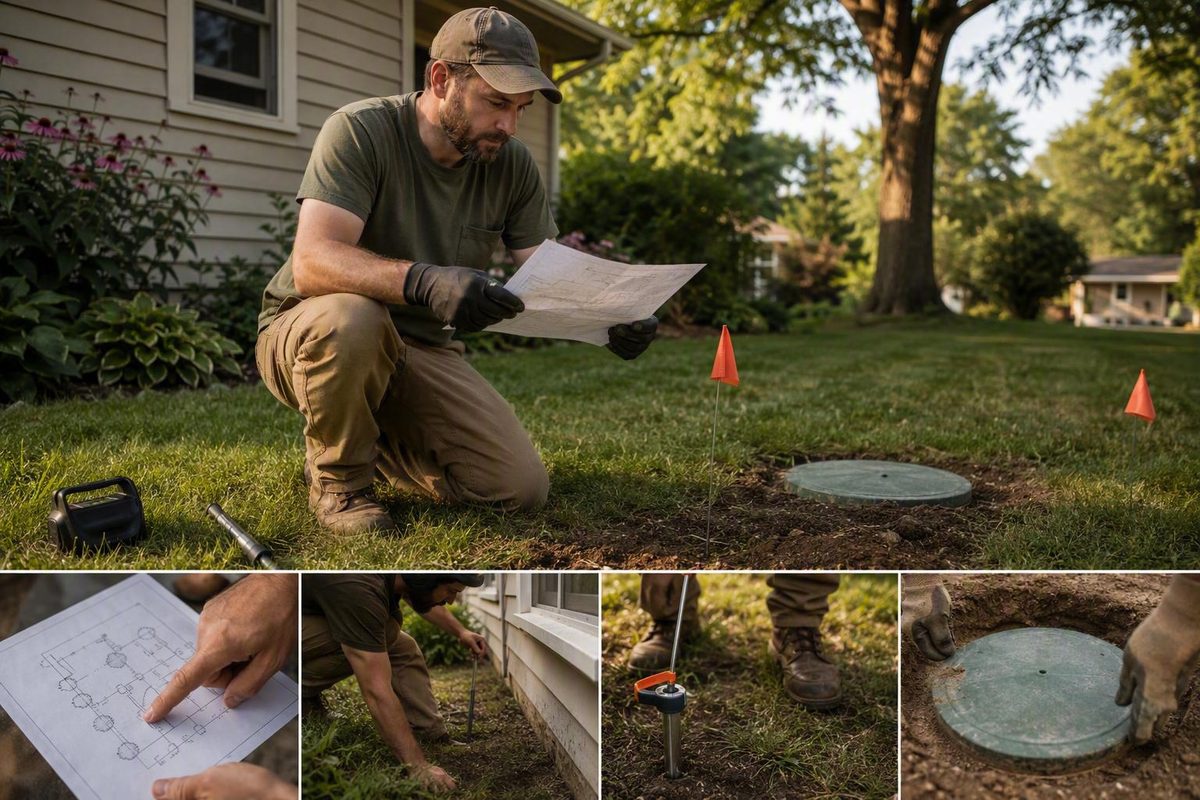
Start with the permit or as-built, trace the sewer exit and compare several yard clues. Treat probing as secondary confirmation, not the start of the search.
Finding a buried septic tank should be a process of narrowing and confirming—not guessing and digging. The safest sequence is:
- Obtain the septic permit, record drawing, or as-built design.
- Identify where the building sewer leaves the house.
- Inspect the most likely yard corridor for several matching clues.
- Cautiously confirm the suspected area without forceful probing or blind excavation.
- Call a qualified septic professional if the evidence remains unclear or any hazard appears.
Before starting, separate four goals that homeowners often confuse:
- Tracing the building sewer: Following the wastewater pipe from the house toward the tank.
- Finding the tank body: Establishing the tank’s buried footprint.
- Finding the access lid or lids: Locating the service openings, which may not be obvious from the tank outline.
- Identifying the drainfield: Verifying the separate area that receives liquid effluent after it leaves the tank.
In a conventional system, household wastewater travels through the building sewer to the septic tank. Solids remain in the tank while liquid effluent leaves through an outlet and continues toward the drainfield. Finding one lid does not reveal the sewer’s entire route, the tank’s full outline, or the drainfield boundaries.
Related: Septic System Filter: Cleaning, Clog Signs and Replacement.
Start With a No-Dig Location Plan
Decide what level of evidence you need before walking the yard with tools. A practical three-level test is:
- Possible clue: A depression, mound, vegetation change, exposed cap, or remembered location.
- Supporting evidence: Multiple independent clues agree—for example, two as-built measurements intersect the projected sewer route at a shallow rectangular depression.
- Confirmed location: Careful physical verification or professional tracing identifies the tank or access point with enough confidence for the intended work.
One clue rarely provides a reliable answer. Grass can change for many reasons. A buried hard surface could be a tank, utility enclosure, old foundation, rock, or construction debris. A cleanout indicates access to piping but does not prove that the underground pipe continues in a straight line.
The required confidence depends on what you plan to do. An approximate location may be enough to keep a garden away from the system. Pumping requires the correct access point. Construction, grading, excavation, or heavy-equipment work may require verification of the tank edges, pipes, and drainfield—not merely an estimate of the tank’s center.
Stop immediately if you encounter sewage, standing water, strong wastewater odors, unstable or sinking soil, a questionable cover, or an indoor plumbing backup. Damp spots, odors, bright green spongy grass, and surfacing sewage can indicate septic-system failure. Untreated sewage may expose people and animals to pathogens and contaminate groundwater or surface water, according to the Washington State Department of Health’s septic-failure guidance.
Locating a tank does not authorize you to open it, enter it, service it, repair it, or leave an access cover exposed. Those tasks involve separate structural, biological, atmospheric, and lifting hazards.
Find the Septic Permit or As-Built Drawing First
Search the documents already associated with the property, including:
- Closing documents
- The home inspection report
- Property plans and surveys
- Original building or septic permits
- Previous septic inspection reports
- Pumping and maintenance records
- Repair invoices
- Files supplied by a former owner
- Plans for additions, decks, garages, pools, driveways, or major landscaping
If these files do not contain a usable drawing, contact the local health, environmental, building, or other authority responsible for onsite wastewater permits. Septic systems are primarily regulated at state and local levels, so the responsible office, available records, request procedure, and possible fees vary by jurisdiction. The EPA recommends requesting the property’s septic record drawing, often called an as-built design, along with associated permits from the local permitting authority (EPA septic-system FAQ).
Useful terms for the request include:
- Septic permit
- Septic record drawing
- Installation drawing
- System layout
- As-built design
- Onsite wastewater record
Have the street address and parcel information available. An office may instead search by owner, permit number, subdivision, lot, or installation date, so ask what its records system uses rather than assuming every jurisdiction follows the same process.
An as-built may show:
- The septic tank
- The building sewer and tank connections
- The drainfield
- A distribution box or other components
- Installation details
- Measurements from a building corner, property line, road, well, or another landmark
Treat the drawing as evidence rather than automatic proof. A fence, tree, shed, driveway edge, or other reference shown on the plan may also have moved or disappeared. Replacement systems, additions, grading, and landscaping can make the current property differ substantially from the recorded layout.
Cross-check the drawing before relying on it:
- Find two dimensions measured from separate permanent landmarks.
- Confirm that those landmarks remain in their original positions.
- Compare the indicated location with the point where the building sewer leaves the house.
- Look for compatible surface features in the measured area.
- Check whether later construction or site alterations could have changed the route or system.
Two measurements are more useful than one. A single distance from one building corner describes an arc of possible locations. Distances from two separate permanent points narrow the likely intersection.
Historical knowledge can provide additional clues. Ask a previous owner, home inspector, installer, or pumping company whether they retained a sketch, service ticket, photograph, or measurement. A pumping record may identify where workers previously accessed a lid. A recollection such as “it was beside the old apple tree,” however, remains a clue rather than confirmation.
Trace the Main Sewer Pipe From the House
When records are missing or imprecise, use the building sewer to define the next search area. In an unfinished basement or accessible crawl space, look for the large wastewater pipe into which smaller fixture drains converge. Multiple locating guides commonly describe this building sewer as approximately four inches in diameter, although the actual installation must be identified rather than assumed (Ground Stone locating guide).
Do not confuse the building sewer with a plumbing vent. The sewer carries wastewater out of the building, generally below fixture level. A vent rises through the building and roof as part of the drainage system. A roof vent may provide broad context about the plumbing layout, but it does not establish the underground route outside.
An exterior capped cleanout can provide another alignment clue. It may be near the foundation or farther along the sewer route and is intended to provide pipe access. Its position does not prove that the tank lies directly beyond it.
Once you identify the sewer’s foundation exit:
- Note the exact exit point inside.
- Find the corresponding point outside.
- Record the direction in which the pipe appears to travel.
- Extend that direction into the yard as a search corridor, not a guaranteed line.
- Compare the corridor with the as-built measurements and surface clues.
Make the corridor wide enough to allow for an angled run or bend. The underground sewer can turn, and the tank may sit around a building corner rather than directly in front of the foundation exit. Grade, obstacles present during installation, later additions, and the original system design can all affect the route.
Published locating guidance commonly places residential tanks within approximately 5 to 25 feet of the house, but that range is only a starting clue. The EPA describes roughly 10 feet as usual while emphasizing that local requirements and site design affect placement. Soil, slope, groundwater, setbacks, building additions, replacement work, and available drainfield area can place a tank outside common estimates (The Septic Guide’s placement overview).
Do not reject a location merely because it appears too close or too far according to an online estimate. Do not assume the tank must be in the backyard either. A side-yard location or route around a corner is possible.
If the home has a finished basement, slab-on-grade construction, inaccessible crawl space, or another layout that hides the outlet, do not invent a universal exit location. Check the septic plans and exterior walls for a cleanout. Review utility-room plumbing and previous inspection photographs without removing finished materials. If the route remains concealed, a plumber or septic locator may be able to trace accessible piping.
Treat the following only as alignment clues:
- An exterior cleanout
- A roof vent
- The location of bathrooms or the utility room
- A general downhill direction
- A neighboring property’s tank position
Similar houses in one development may have comparable layouts, but differences in lot design, grading, repairs, and construction changes make a neighbor’s system only a rough analogy.
Read Yard Clues Without Mistaking Them for Proof
Walk the probable corridor slowly in good daylight. Look for a cluster of compatible features rather than one supposedly decisive sign.
Possible clues include:
- A visible riser or larger access cover
- A capped cleanout
- An inspection pipe
- A shallow depression
- A slight mound or raised rectangle
- Disturbed or differently settled soil
- A faint rectangular outline
- Vegetation that differs from the surrounding lawn
- A section where snow melts differently
- An open area without large trees or permanent structures
A riser extends a buried access opening toward ground level, reducing the excavation required for future service. It may appear as a larger circular green or black cover.
Never label an object as septic access solely because it is round, green, black, or located in the expected corridor. Similar-looking features include:
- Irrigation valve boxes
- Utility enclosures
- Sewer cleanouts
- Septic inspection ports
- Distribution-system components
- Drainage structures
- Abandoned system parts
Expected placement patterns can help prioritize the search but cannot conclusively include or exclude an area. Tanks are less likely to have been deliberately installed beneath large trees, heavy-traffic zones, paving, buildings, decks, or other permanent structures because access and loading can be problematic. Older systems, undocumented changes, later construction, and replacement work can nevertheless produce unexpected arrangements.
A depression may result from settlement over a tank or previous excavation, but it can also come from drainage, a removed stump, animal activity, landscaping, or buried debris. A mound may belong to a drainfield design rather than the tank. Faster snowmelt can reflect sunlight, soil moisture, shallow infrastructure, or heat loss from another source.
Vegetation requires particular caution. A modest difference in grass growth may help narrow a search when it matches the records and sewer corridor. Wet, odorous, bright green, or spongy ground belongs on the failure-warning branch of the decision process. It could be associated with the tank, drainfield, leaking piping, or unrelated drainage, and it does not identify an access lid.
Do not walk through, probe, or excavate ground where sewage or suspected septic failure is present. Keep people and animals away and contact a qualified septic professional; untreated sewage can contain pathogens and other contaminants that threaten health and water quality (Washington State Department of Health).
Before using any confirmation method, ask whether the surface clue agrees with:
- The as-built measurements
- The building sewer’s probable route
- Two permanent landmarks
- The property’s current grade
- Known pumping, inspection, or repair history
A depression that matches none of these is weak evidence. A visible cover where two as-built measurements intersect the sewer corridor is much stronger supporting evidence, but the object still needs to be identified before anyone treats it as a service opening.
Confirm a Suspected Area Without Forceful Probing or Blind Digging
Probing is a secondary confirmation method—not the beginning of the search. Consider it only after records, pipe direction, and surface observations have narrowed the search to a relatively small, dry, stable area.
A soil probe is a thin rod used to feel for a buried solid surface with limited disturbance. Contact with something hard may suggest a tank top or lid, but it may also be rock, concrete debris, an irrigation component, a utility enclosure, an old foundation, or another buried object.
There is no universal safe probing interval or target depth. Recommendations differ, and actual conditions vary with soil, frost, tank material, pipe placement, lid condition, landscaping, and burial depth. FloHawks says that, in most cases, septic-tank components are buried between 4 inches and 4 feet underground How To Locate Your Septic Tanks - FloHawks Plumbing + Septic.
If probing is appropriate, use minimal downward force and stop at resistance rather than trying to drive through it. Aggressive probing can crack a fragile lid or damage an inlet pipe, baffle, inspection port, plastic component, irrigation line, low-voltage wire, or other private infrastructure. Commercial and septic-service guidance consistently treats probing as a cautious method to use only after the target area has been narrowed (Dillon Septic’s probing guidance).
Before any digging, check for underground hazards and follow the notification, permit, and utility-marking procedures that apply in your area. Calling 811 can help arrange marking of participating utilities, but it should not be treated as a complete map of private septic components, irrigation systems, private electrical feeds, or every line on the property. Commercial utility-locating guidance likewise distinguishes marked utilities from private infrastructure that may remain unidentified (T&T Tools locating overview).
Do not probe:
- In wet, odorous, or sewage-contaminated ground
- Near a suspected drainfield
- Where soil is sinking, hollow, or unstable
- Near a questionable cover
- Where utilities or private lines remain uncertain
- With enough force to penetrate an unknown object
Blind digging creates similar risks. Excavation can damage the sewer, tank, lid, wiring, irrigation, or other buried features.
This guide does not provide instructions for uncovering or opening a septic-tank lid. If an exact access point is required for pumping, construction, excavation, grading, or heavy-equipment work, arrange professional confirmation rather than expanding a speculative hole.
Choose Locating Tools Based on the Tank and Site
No locating method works equally well on every property. Tank material, pipe access, soil, groundwater, burial depth, nearby debris, tracer-wire availability, site congestion, and operator skill all influence the result.
| Method | What it can locate | Major limitation | Appropriate user |
|---|---|---|---|
| Records and measurements | Recorded positions of tanks, pipes, drainfields, and landmarks | Records may be missing, approximate, outdated, or tied to changed landmarks | Homeowner or professional |
| Visual inspection | Risers, covers, cleanouts, depressions, mounds, and disturbed soil | Surface appearance does not confirm identity | Homeowner or professional |
| Gentle soil probe | A buried solid surface or possible component outline | Hard contact does not identify the object; force can cause damage | Cautious homeowner in a narrowed, hazard-checked area or a professional |
| Metal detector | Steel tanks, metal lids, fittings, or rebar in reinforced concrete | Cannot directly detect an all-plastic or fiberglass tank; unrelated metal creates false leads | Experienced homeowner with a suitable target or a professional |
| Sewer camera | Pipe interiors, bends, defects, obstructions, and route context | Access, pipe condition, turns, standing water, and obstructions can limit travel | Plumber or septic professional |
| Trackable transmitter | The route or approximate endpoint of a device emitting a detectable signal | Requires suitable pipe access and correct deployment; interpretation is not foolproof | Professional locator |
| Electronic or electromagnetic locator | A transmitter signal, tracer wire, or detectable metallic component | May not work without a conductive path, signal source, tracer wire, or metal | Trained professional |
| Ground-penetrating radar | Subsurface anomalies and underground objects that may be mapped | Results vary with soil, groundwater, depth, congestion, material, and interpretation | Experienced professional |
Metal detectors
A metal detector may help when the target contains detectable metal, such as:
- A steel tank
- Rebar in reinforced concrete
- A metal access lid
- Metal fittings or hardware
Concrete itself is not metal, and a detector cannot directly sense a tank made entirely from plastic or fiberglass. Detection depends on the presence, size, orientation, and depth of metal components (Garrett’s material-specific detector guidance).
Every signal requires corroboration. Buried cans, fencing, pipes, construction debris, old equipment, abandoned tanks, and unrelated utilities may all produce responses. A detector signal is a reason to compare records and geometry—not a reason to begin digging.
Cameras
A professional may insert a sewer camera through an accessible cleanout or pipe to inspect the building sewer.
A camera does not see through soil. Its usefulness depends on suitable access, pipe condition, standing water, bends, and whether an obstruction prevents further travel.
Trackable transmitters
A trackable or flushable transmitter emits a signal that a receiver can follow from the surface. This may help estimate the path of accessible piping or the point where the device stops.
The endpoint still requires interpretation.
Electronic and electromagnetic locating
Electronic locating commonly pairs a transmitter with a receiver. Electromagnetic equipment may follow a tracer wire or respond to conductive metallic components.
A nonmetallic system without a tracer wire, conductive path, or usable transmitter route may provide little for the locator to detect. Even when a signal exists, nearby infrastructure and operator interpretation can affect the result.
Ground-penetrating radar
Ground-penetrating radar is a professional option for detecting underground objects and changes in subsurface conditions. It may help map anomalies where components are nonmetallic or inaccessible, but it is not a guaranteed septic-tank finder. Groundwater, soil composition, depth, surface access, nearby objects, and operator skill can materially affect the result (American Liquid Waste’s locating overview).
Choose the method according to the suspected material and site. A metal detector may suit a steel target but not an all-plastic tank. A transmitter may be more useful when the pipe is accessible. Radar may be considered for difficult nonmetallic targets, subject to site-specific limitations.
Know When to Stop and Call a Septic Professional
A DIY search should end when risk rises faster than confidence. Stop and call a qualified septic professional if you encounter:
- Sewage backing up into the house
- Sewage surfacing outside
- Strong wastewater odors
- Standing water or persistently saturated ground
- Sinking, cracking, or collapsing soil
- Suspected tank or pipe damage
- A rusted, wooden, cracked, homemade, loose, or flimsy cover
- Uncertain utilities or private underground lines
- Plumbing that is inaccessible for tracing
- A large or heavily altered property with poor records
- No clear result after a systematic records, pipe, and yard review
Old or damaged covers can fail under a person’s weight, and sinking soil may conceal a void or deteriorated structure. Rusted, wooden, improvised, or flimsy covers can create a fatal fall hazard, particularly around older or collapsing systems (FloHawks septic-location safety guidance).
Never:
- Enter a septic tank
- Lean or stand over a questionable cover
- Test a lid by putting your weight on it
- Remove a cover merely to identify it
- Leave a tank or access opening uncovered
- Work around an open tank
- Attempt a rescue by entering a tank
Other hazards include pathogens, heavy covers, unstable soil, deteriorated structures, and uncontrolled access by children or animals. Septic-industry safety guidance warns that removing or leaving covers open can expose people to gases and fatal fall hazards (Ground Stone safety guidance).
When requesting locating help, provide:
- The property address and parcel information
- Available permits, plans, and as-built drawings
- The point where the building sewer appears to leave the house
- Previous pumping, inspection, and repair history
- The suspected tank material, if known
- Photographs or notes documenting yard clues
- Information about additions, decks, paving, grading, or major landscaping
- Any backups, odors, wet areas, or other failure symptoms
- The purpose of the location work
A professional may use pipe tracing, a camera, a transmitter and receiver, electromagnetic equipment, careful excavation, or ground-penetrating radar. None guarantees an immediate result, particularly where records are poor, pipes are obstructed, the site contains buried debris, or the system has been abandoned or relocated.
Professional confirmation is especially important before construction, excavation, major landscaping, pumping, grading, or driving heavy equipment over an uncertain area. These activities may require verified tank edges, pipe routes, access points, and drainfield boundaries—not simply an approximate tank location.
Map the Tank and Protect the Area After It Is Found
Once the location has been confirmed, create a durable record while the evidence is fresh. Do not rely on memory, a removable garden ornament, or one distance from the house.
Measure the confirmed tank or lid from two permanent landmarks, such as separate building corners. Record the exact point being measured—for example, the center of the inlet-side lid rather than simply “the tank.” If the tank outline has been verified, document which measurement corresponds to each edge or corner.
Use this template:
Septic location record
- Date confirmed:
- Confirmed by:
- Confirmation method:
- Tank material, if verified:
- Tank outline or edges, if verified:
- Access-lid positions:
- Building-sewer approach direction:
- Tank outlet direction:
- Drainfield direction, only if verified:
- Landmark 1 and measurement:
- Landmark 2 and measurement:
- Photographs taken:
- Recent service notes:
- Known repairs or alterations:
- Uncertainties still remaining:
Take wide photographs that include the house and permanent reference points, followed by closer photographs of confirmed access locations. A close-up photograph of grass without surrounding context will be difficult to interpret years later.
Keep the sketch with the septic permit, as-built drawing, inspection reports, pumping history, repair records, and property plans. If a service visit is imminent, use a temporary visible marker that will not become a trip hazard, puncture a component, or interfere with equipment.
Knowing the location helps prevent accidental excavation, deep-rooted planting, structures, paving, or vehicle traffic over the tank and drainfield. Tanks and drainfield pipes can be damaged by loading from vehicles or structures, so uncertain areas should be professionally verified before heavy use (Septic Services of Central Florida’s system-protection guidance).
Ask a qualified septic professional whether an access riser is suitable for easier future service.
Keep the limits of the confirmed information clear:
- A confirmed lid is not necessarily the full tank outline.
- A confirmed tank does not establish every buried pipe.
- The outlet direction does not prove the drainfield boundaries.
- A drainfield clue does not identify a distribution box or individual trench.
- An old component may belong to an abandoned system.
If you are planning work involving the absorption area, use DrainFinder’s drain-field replacement planning guide to organize records, diagnosis, design, and pre-excavation questions. Locating one tank lid does not map the entire septic system.
Frequently Asked Questions
How far from the house is a septic tank usually located?
Published residential locating guidance commonly describes tanks as approximately 5 to 25 feet from the house. The EPA describes roughly 10 feet as usual, but local requirements and site design can produce different placements (EPA septic-system FAQ).
Use these figures only to define an initial search area. A tank may be farther away, positioned around a building corner, or reached by a pipe that angles away from the foundation. Grade, soil, groundwater, setbacks, additions, obstacles, replacement work, and drainfield design can all affect the layout.
The sewer exit, as-built measurements, and multiple yard clues are more useful together than any assumed distance.
How deep is a septic tank or access lid?
Published estimates range from a few inches to approximately four feet or more below grade. A lid fitted with a riser may be visible at the surface, while an older access point may remain buried (The Septic Guide’s burial-depth overview).
Depth is not a reliable identification rule. Tank design, climate, grading, erosion, added fill, groundwater, soil, and later landscaping can change the amount of cover. Failure to contact a solid object at a quoted depth does not prove the tank is elsewhere, and hard contact does not prove the object is septic infrastructure.
Do not continue probing simply because an online estimate says the tank should be at a certain level. Use professional confirmation when the location must be exact.
Can a metal detector find a concrete, plastic, or fiberglass septic tank?
A metal detector may locate:
- A steel tank
- Rebar in a reinforced concrete tank
- A metal access lid
- Metal fittings or hardware
It does not detect concrete itself and cannot directly detect a tank made entirely from plastic or fiberglass. Even when metal is present, depth, soil, equipment capability, nearby debris, and the metal’s size and orientation can affect the response (Garrett’s septic-tank detector guidance).
Every signal needs corroboration because unrelated pipes, scrap, fencing, construction debris, or abandoned equipment may produce a similar response. Records, pipe tracing, transmitters, professional probing, or radar may be more suitable for nonmetallic systems.
Does calling 811 locate private septic tanks and pipes?
Do not treat 811 as a septic-system mapping service. It can help arrange marking of participating underground utilities before digging, but privately owned septic tanks, septic pipes, irrigation systems, private electrical feeds, and other lines may not be included.
Ask the notification center and responding utility owners what they will and will not mark. If private infrastructure remains uncertain, a private locator or septic professional may be needed. Utility markings also cannot identify an unknown buried hard surface as a septic tank.
Does greener grass or wet ground show where the septic tank is?
Not reliably. A modest vegetation difference may help narrow the search when it agrees with the records and sewer route, but grass color alone cannot identify a tank.
Wet ground, standing water, strong odors, sewage, or bright green spongy grass may indicate a malfunction near the tank, piping, or drainfield. These conditions can also result from irrigation, drainage, shade, soil differences, or another buried feature.
Treat wet or odorous ground as a safety warning rather than an invitation to probe. Keep people and animals away and have the system assessed by a qualified septic professional.
The practical sequence is straightforward: request the permit or as-built, identify where the building sewer leaves the house, and compare that route with several independent yard clues. Avoid invasive work unless the evidence agrees and buried hazards have been addressed. The goal is a confirmed, documented location—not a guess based on distance, grass color, or one detector signal.
If you encounter sewage, unstable ground, a questionable cover, uncertain utilities, or no clear result, stop and call a qualified septic professional. Once the tank and access points are confirmed, measure them from two permanent landmarks and retain the record for future service and property work.