
How to Deal With a Slow Drain Safely, Step by Step
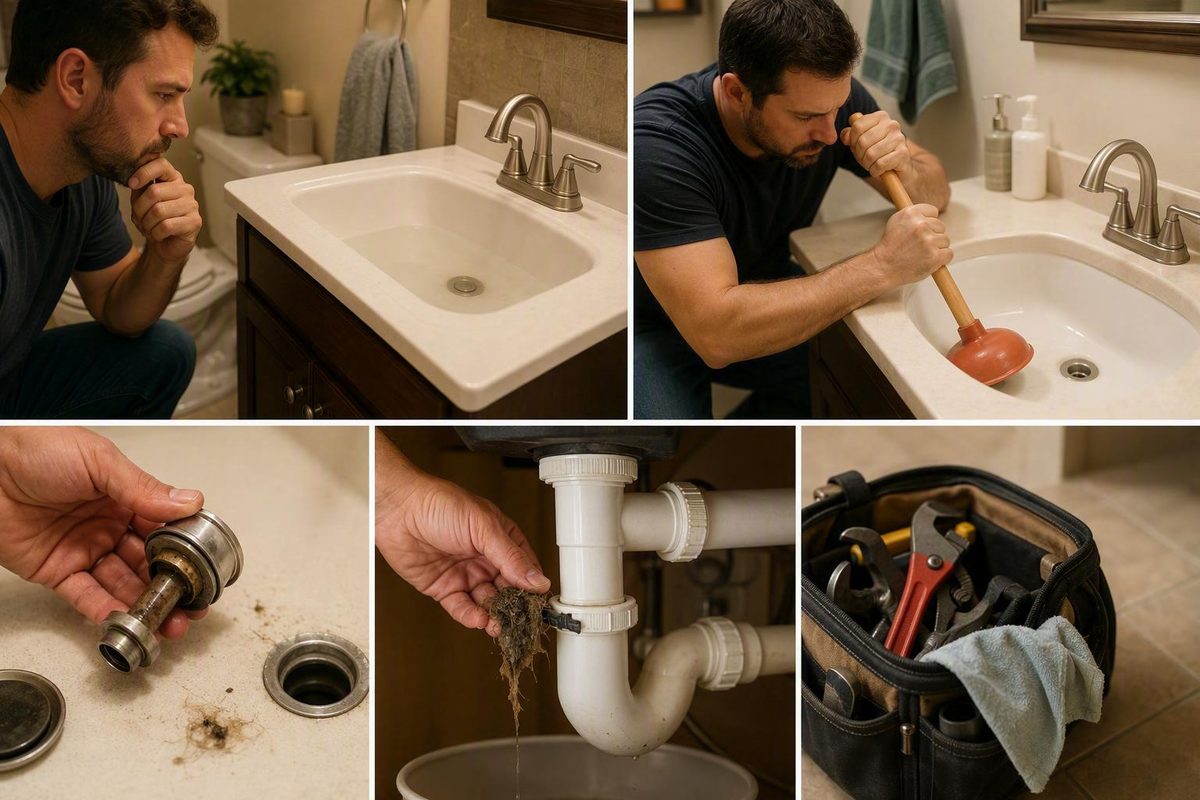
For one slow sink, clean accessible parts, plunge with the overflow sealed, then inspect the P-trap. Stop if plunging makes water rise or gurgle in another fixture.
Overview
To deal with a slow drain, first confirm that the problem is limited to one fixture. Then clean the accessible drain parts, plunge with the overflow sealed, inspect the P-trap, and use a manual hand snake only if the trap is clear. After each step, check for faster flow, dry joints, and reactions elsewhere.
A slow drain that still moves water often points to a partial obstruction. Hair, soap residue, grease, personal-care products, and other debris can collect at the stopper, inside the pop-up assembly, in the P-trap, or farther along the drainpipe, according to Liquid-Plumr’s slow-drain guide and Meticulous Plumbing.
The order matters because it moves from accessible components toward deeper piping. Stop once normal drainage returns. If several fixtures are slow, another drain reacts when you run water, or the problem includes backups, persistent odors, or recurring symptoms, treat it as a possible shared-pipe problem rather than continuing to dismantle one sink.
Diagnose the Slowdown Before Taking Anything Apart
Start by observing the pattern. One slow sink while every other fixture behaves normally is more consistent with debris near that fixture. Simultaneous trouble in several fixtures, particularly when they react to one another, shifts attention toward a shared branch or main drain, according to Plumber’s Almanac and Olson Superior Plumbing.
| What you observe | What it may indicate | Appropriate next decision |
|---|---|---|
| One sink drains slowly, but nearby fixtures work normally | A local partial obstruction in the stopper, pop-up assembly, tailpiece, P-trap, or pipe serving that fixture | Begin with accessible cleaning and proceed through the manual steps below |
| Hair or residue is visible around the stopper | Debris is restricting the drain opening or pop-up assembly | Remove and clean the accessible components, then retest |
| Several fixtures in the same area slow down together | A restriction may be in a shared branch rather than one fixture | Avoid treating each fixture as a separate clog; consider professional diagnosis |
| Fixtures in different rooms or on different floors are slow | The restriction may be farther downstream in shared piping | Stop localized disassembly and call a plumber |
| Running or flushing one fixture makes another gurgle or its water level change | The affected fixtures may share a restricted downstream pipe | Stop the one-fixture procedure and arrange a broader diagnosis |
| Water backs up into another drain | Flow is obstructed beyond the individual fixture | Stop using the affected fixtures and call a plumber |
| Persistent bad odors accompany slow drainage | The issue may extend beyond ordinary accessible debris | Seek professional diagnosis, especially if more than one drain is involved |
| The sink gurgles without a backup | A restriction or venting issue may be possible, but the symptom does not settle the cause | Check for other shared-system symptoms and escalate if the cause remains unclear |
You can perform a bounded cross-fixture check by running the slow fixture while observing nearby drains and toilets. If another fixture gurgles or its water level changes, Plumber’s Almanac treats that reaction as evidence that the restriction is in shared piping.
Venting is less certain. A Home Improvement Stack Exchange discussion suggests checking the plumbing vent and sink overflow path, while other supplied guidance describes venting only as one possible explanation for gurgling. These sources do not establish a reliable homeowner test that separates venting, an overflow-path restriction, and a downstream clog. Do not undertake unsafe roof or inaccessible-pipe work to resolve that uncertainty.
Prepare for the Repair
This procedure is centered on a sink with a likely local obstruction. It does not provide equivalent instructions for tubs, showers, garbage disposals, septic connections, or every pipe material because the required access and compatibility details are not established by the supplied evidence.
Before beginning, have the following ready:
- A bucket that fits beneath the P-trap
- Towels for water released during disassembly
- A suitable manual sink plunger
- A wet rag for sealing the overflow during plunging
- A manual hand snake, but only if you reach the deeper-pipe step
- Clear access to observe the drain and all reassembled joints
The bucket is necessary because the trap retains water, as noted in both the community repair guidance and Plumber’s Almanac procedure. Do not remove piping you cannot safely reach or confidently reassemble. Your success criteria are sustained improvement in drainage, normal operation of the removed parts, and dry joints after testing.
Clear the Slow Drain in Order
Begin with the obstruction you can reach most easily. After each step, reinstall or reassemble what you removed, run water, and observe the result. Continue only if the drain remains slow and no other fixture reacts. This sequence follows the progression described by Liquid-Plumr, Meticulous Plumbing, and the supplied community repair guidance.
Step 1: Clean the Strainer, Stopper, and Pop-Up Assembly
Inspect the drain opening before reaching for a deeper tool. Remove the accessible strainer or stopper only if you can do so safely, then pull away visible hair, residue, and debris instead of pushing it farther into the drain.
This step matters because sink stoppers and pop-up assemblies can collect hair and other material. The community repair guidance specifically notes that hair may collect around a stopper’s pivot-rod assembly, while Meticulous Plumbing identifies the stopper as a common collection point.
Clean the removable part, reinstall it, and confirm that it opens and closes normally. Run water and watch how quickly the basin empties. Faster, sustained flow indicates that accessible debris caused at least part of the restriction. If the drainage does not change, the blockage may be below the drain opening, so proceed to plunging.
Do not turn a simple inspection into unfamiliar linkage disassembly. If you cannot identify how the stopper is retained or cannot restore its operation, stop and seek help rather than forcing the mechanism.
Step 2: Plunge With the Overflow Sealed
Use a manual sink plunger after accessible debris has been removed. Add enough water to let the plunger cup form a seal over the drain, then cover the sink’s overflow opening with a wet rag. Sealing the overflow helps direct the plunger’s pressure into the drain rather than letting it escape through the overflow path, a technique described by Plumber’s Almanac.
Work the plunger with controlled, repeated strokes while maintaining the seal. The supplied evidence supports plunging as a local-clog step, but it does not establish one universal stroke count or duration for every sink. Judge the result by water movement, not an arbitrary number.
Remove the plunger and run water. If the sink empties faster and stays improved during another test, a loose local obstruction may have moved. If plunging produces no useful change but all other fixtures remain normal, proceed to the P-trap.
Stop if plunging makes water rise or gurgle in another fixture. Olson Superior Plumbing identifies cross-fixture reactions as evidence that the problem is downstream in shared piping, not merely at the slow sink.
Step 3: Remove and Clean the P-Trap
Inspect the P-trap only when it is safely accessible. The P-trap is the curved pipe beneath the sink, and it can hold both retained water and accumulated debris. Place the bucket directly underneath before loosening anything, as recommended by Plumber’s Almanac and the supplied community repair guidance.
Support the trap as you loosen its accessible slip joints. Lower it carefully into the bucket so retained water does not spill into the cabinet. Inspect the removed section and clear out any material you find. The evidence supports cleaning an accessible trap, but it does not provide universal disassembly instructions for every connection, pipe material, or older plumbing arrangement.
Before reassembly, make sure the parts return to their original alignment. Reconnect the joints without using excessive force. The community source advises hand-tightening the nuts, but if a joint is corroded, damaged, leaking, or does not reconnect normally, stop rather than forcing it.
Run water while watching every joint you disturbed. Successful trap cleaning produces two observable results: the sink drains faster, and the reassembled joints remain dry. A leak means the repair has not passed verification even if drainage improves. Stop the test, contain the water, and correct the joint only if you can do so safely.
If the trap contains no meaningful obstruction and the sink is still slow, that result is useful. It shifts attention beyond the trap toward the drainpipe entering the wall, which is the next location identified by Liquid-Plumr.
Step 4: Use a Hand Snake Beyond a Clear Trap
Use a manual hand snake only when the symptom pattern still looks local, the P-trap is clear, and you have safe access to the pipe beyond it. A clear trap does not prove the full drain is open. It means the accessible curved section was not the source, so a local obstruction may sit farther along the drainpipe.
With the trap removed and the bucket still in place, introduce an appropriate manual snake into the accessible drainpipe. Advance it carefully, then withdraw it to see whether it retrieves hair or other debris. Both Liquid-Plumr and Meticulous Plumbing support manual snaking as a way to retrieve hair and debris beyond the drain opening.
Do not force the cable through firm or unfamiliar resistance. The evidence does not establish how to distinguish an obstruction from a pipe fitting by feel, so resistance that cannot be navigated gently is a stop signal. The supplied community guidance also warns inexperienced users against electric augers because they can damage pipes.
Reassemble the trap and test the sink. Retrieved debris followed by faster flow supports a cleared local obstruction. No debris, no improvement, inaccessible piping, or any need for powered equipment means the basic DIY sequence has reached its limit.
Verify Flow and Check for Leaks
Verification is required after every completed step, not just at the end. Run water long enough to observe whether drainage remains improved rather than clearing only momentarily. Confirm that the stopper or pop-up still operates normally and inspect every joint disturbed during trap removal.
A successful result has three parts: water leaves the basin at a normal, sustained rate; no other fixture reacts; and every reassembled joint stays dry. The supplied community procedure specifically calls for testing both flow and leaks after reassembly.
Do not count temporary improvement as a complete repair if the same slowdown quickly returns. Likewise, improved drainage with a leaking trap is a failed repair. Stop using the sink if necessary to contain leakage, and arrange professional help when the joint cannot be made dry through safe, ordinary reassembly.
Troubleshooting When the Drain Is Still Slow
A failed step should narrow the likely location rather than prompt random remedies.
- No debris at the stopper: The restriction may be below the drain opening. Try plunging if the problem remains isolated.
- No improvement after plunging: Inspect the accessible P-trap, provided you can remove and reassemble it safely.
- The P-trap is clear: The obstruction may be farther into the wall pipe. A bounded attempt with a manual hand snake is the next supported local step.
- Flow improves only temporarily: A deeper or recurring restriction may remain. Stop repeating the same clearing step and arrange diagnosis.
- Another fixture reacts: Treat the problem as a possible shared branch or main-line restriction and stop working on the sink alone.
- A reassembled joint leaks: The procedure has failed verification, regardless of whether the drain is faster.
This decision path follows the accessible-to-deeper sequence supported by Liquid-Plumr and the escalation signals identified by Plumber’s Almanac. If basic cleaning and manual snaking do not produce sustained improvement, the remaining cause is outside the evidence-bounded scope of this DIY procedure.
Safety Limits and When to Call a Plumber
Stop ordinary DIY troubleshooting when the symptoms no longer fit one accessible local obstruction. Professional diagnosis is appropriate when:
- More than one fixture is slow
- Running one fixture causes gurgling, rising water, or backup in another
- Water has backed up into any drain
- Bad odors or unusual noises persist
- The same slowdown returns after clearing
- Basic stopper cleaning, plunging, trap cleaning, and bounded manual snaking do not work
- The piping is old, corroded, damaged, or already leaking
- The trap or downstream pipe is inaccessible
- The next step would require a powered auger or unfamiliar disassembly
These limits are supported across the supplied community guidance, Meticulous Plumbing, and Plumber’s Almanac. Multiple-fixture symptoms and backups are more concerning than one slow sink because they point toward piping shared by several fixtures.
Avoid introducing harsh chemical drain cleaners. The supplied sources warn that caustic cleaners can create hazards and may damage pipes or finishes, but they do not provide product-specific instructions for a drain that already contains cleaner. That situation requires guidance specific to the product and exposure rather than this mechanical procedure.
Advice about boiling water conflicts across the evidence. Olson Superior Plumbing recommends a boiling-water flush, while other supplied material cautions that boiling water may be unsuitable for plastic plumbing. The evidence also does not establish the effectiveness or compatibility of baking soda and vinegar for particular clog types. Without authoritative pipe-specific guidance, neither treatment should be presented as universally safe or reliably effective.
Worked Example: An Isolated Slow Bathroom Sink
Suppose one bathroom sink drains slowly, while the toilet, tub, and other household fixtures work normally. Nothing gurgles or rises when you run the sink. That pattern supports beginning with a local repair, according to the isolated-versus-shared distinction described by Plumber’s Almanac.
You remove the accessible pop-up and find hair and residue attached to it. After cleaning and reinstalling the part, you run water. If the basin now empties normally and the improvement holds, stop. The observable cause and successful flow test make deeper disassembly unnecessary.
If the sink remains slow, seal the overflow with a wet rag and use a manual sink plunger. Test again. Sustained improvement means you can stop, provided no other fixture reacts.
If plunging does not help, place a bucket beneath the accessible P-trap, remove it carefully, and clean any debris. Reassemble it, then check flow and watch the joints. Faster drainage with dry joints is a successful result.
If the trap is clear, the result shifts attention farther into the drainpipe. A careful attempt with a manual hand snake is appropriate only while the problem remains isolated and access is safe. Retrieved debris followed by sustained improvement completes the sequence.
If the snake meets unsafe resistance, the drain remains slow, a joint leaks, or another fixture begins reacting, stop. The observed result has moved the problem beyond a basic isolated-sink repair and into professional diagnosis.
Prevent the Drain From Slowing Again
Prevention focuses on keeping debris out of the drain and cleaning the accessible collection points before buildup restricts flow.
- Use a mesh catcher where it fits the fixture and does not interfere with normal operation.
- Pick out captured hair and debris instead of washing it down the drain.
- Remove and rinse the stopper periodically so residue does not continue accumulating.
- Keep thick lotions, toothpaste clumps, and shaving-cream residue out of bathroom sink drains.
- Avoid sending grease and other heavy residue into drains where it can contribute to buildup.
Liquid-Plumr recommends mesh catchers and removing captured debris rather than washing it down. Meticulous Plumbing similarly recommends cleaning the stopper and keeping thick personal-care residue out of bathroom drains. These habits do not rule out every future plumbing problem, but they directly reduce the materials associated with common local partial obstructions.