
Master Half-Round Gutter Installation: Your Complete Step-by-Step Homeowner Guide
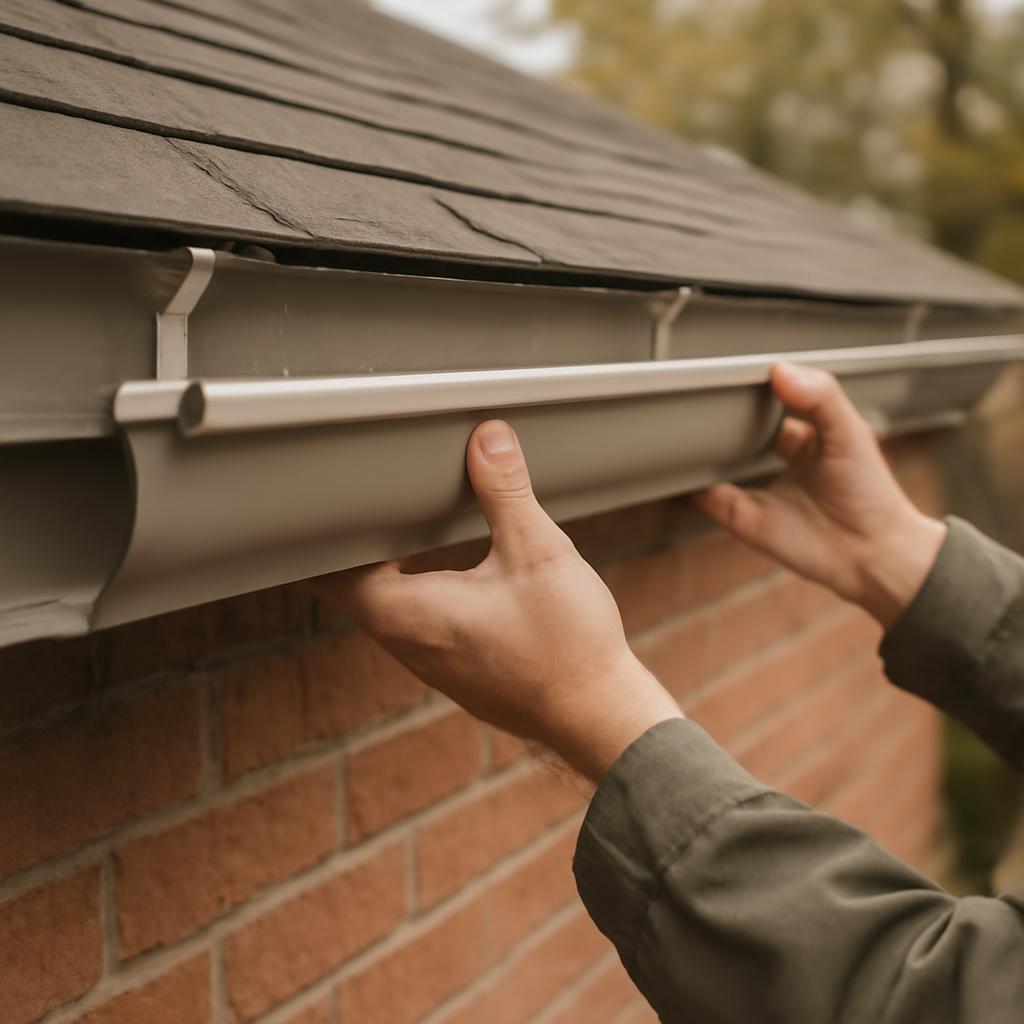
Plan around 24-inch bracket spacing for many homeowner installs, then set the slope, anchor into sound structure and test drainage.
It is less forgiving than a typical K-style job because the profile is exposed, the brackets are visible, and even a small slope error can be obvious from the ground. The basic workflow is still straightforward: confirm the fascia is sound, plan outlets before hanging anything, establish a consistent pitch, and use brackets, fasteners, and sealants that match the gutter material to limit leaks and corrosion (This Old House, Building Moxie, Copper Gutter Supply).
The reason this matters is simple: gutters are part of your home’s exterior drainage path. Their job is to collect roof runoff and move it away from the house so water does not keep dumping beside the foundation (This Old House).
Read this as a planning and installation guide, not a substitute for your system manual. Published guidance varies by material, hanger design, climate, and run length. A common starting point is about 1/4 inch of drop per 10 feet and about 24-inch bracket spacing, but both numbers should be checked against your manufacturer’s instructions and local requirements before you drill anything (Copper Gutter Supply, Building Moxie).
Safety note: This is ladder work at the roof edge, so do not treat it like a casual ground-level DIY project. The evidence behind this guide supports homeowner installs mainly for low, accessible runs; if the roof is high, steep, awkward to reach, the fascia needs repair, or the system is copper and calls for soldering, the safer move is to stop and hire a pro (Joyland Roofing).
| Planning point | Common homeowner starting point | Important caveat |
|---|---|---|
| Slope | About 1/4 inch drop per 10 feet | Some published DIY examples use less on specific runs; verify with system instructions and local requirements |
| Gutter position | Slightly below the roof plane | Helps runoff drop into the trough rather than overshoot | | Downspout brackets | About every 6 to 8 feet | Adjust to fit wall conditions and system hardware | | Long runs | Reconsider outlet layout beyond 40 feet | Supplier guidance suggests dual slope or multiple outlets on long eaves |
Those planning numbers are drawn from This Old House, and KWM Gutterman.
What Are Half-Round Gutters?
Half-round gutters are exactly what the name implies: a trough shaped like a half-circle or half-pipe rather than a boxier profile. That shape is the clearest difference from K-style gutters, which typically have a flat back and bottom with a more decorative front face (This Old House overview).
That geometry changes the installation. Half-round gutters usually do not sit flat against the fascia the way K-style systems often do. Instead, they are commonly supported by external brackets, hangers, or shanks fastened to the fascia or to specialized mounting hardware (Joyland Roofing). That exposed support hardware is part of the classic look, but it also means layout errors are easier to see.
Common half-round materials include aluminum, copper, galvanized steel, zinc, and galvalume (JB Gutterman). Material choice affects more than appearance. It also changes how heavy the sections feel on a ladder, how easily they dent, what fasteners you should use, and whether the joints are typically sealed mechanically or soldered.
Half-round systems are especially common where the gutter is meant to be seen. Supplier and trade guides repeatedly associate them with visible eaves, older homes, restoration work, slate or tile roofs, and houses where the gutter contributes to the architecture (Art of Gutter). That does not make them historic-only; it just means homeowners often choose them for appearance as much as function.
Benefits and When to Choose Half-Round Gutters
The most defensible case for half-round gutters is a mix of appearance, accessibility, and installation style rather than any universal promise of better hydraulic performance. Trade guidance often describes the smooth interior as having fewer interior corners where debris can collect, and This Old House presents that curved form as one reason half-rounds can be easier to maintain. But that is still best read as a common trade observation, not proof that half-round gutters will always clog less than K-style in every climate and tree condition.
Outside brackets are a real practical advantage for cleaning access. Because the supports are often outside the trough instead of interrupting the interior, homeowners may find it easier to reach inside for inspection or hand cleaning (JB Gutterman). Again, that does not eliminate maintenance; it just makes the trough less obstructed.
Half-round gutters also make sense when you want a more intentional architectural line. Their rounded profile is repeatedly associated with visible metalwork, traditional detailing, and rooflines where the gutter is part of the design instead of something you try to hide.
There is also a maintenance and inspection argument. This Old House describes half-round gutters as having fewer corners and seams that can become trouble spots. That is useful as a design tendency, but the important homeowner takeaway is narrower: good joints, solid support, compatible metals, and correct pitch matter more than the profile name.
A simple installation-focused comparison helps clarify when half-round is the right call:
| Installation factor | Half-round | K-style |
|---|---|---|
| Mounting style | Usually hung from external brackets or specialized hangers | Often mounts more directly because of the flat back |
| Visibility of mistakes | Pitch and alignment are easier to see from the ground | Minor waviness can be less obvious |
| DIY tolerance | Usually less forgiving; layout matters more | Often quicker and more forgiving for common residential installs |
| Architectural fit | Common on restoration, custom, or highly visible eaves | Common on modern homes |
That comparison reflects, and This Old House installation guide.
Choose half-round when:
- You want a traditional or highly visible gutter profile.
- You are matching historic details or an existing half-round system.
- The roofline is straightforward enough that careful bracket layout is realistic.
- You are comfortable following a more exacting install sequence than many K-style jobs require.
Think twice when:
- The roof is high, steep, or awkward enough that stable ladder work is questionable.
- You want the fastest, most forgiving DIY install.
- The run is long and would require very obvious pitch over a single outlet.
- The material is copper or another metal that may push the project into more specialized joinery.
Half-Round Gutter Materials Compared
Material choice changes the entire feel of a half-round gutter installation. Weight, stiffness, dent resistance, corrosion behavior, and joinery method all shift with the metal you choose.
| Material | What the evidence supports | Practical installation note |
|---|---|---|
| Aluminum | Lightweight, affordable, rust-resistant, available in colors, but more dent-prone than heavier metals | Often the most approachable material for homeowner handling |
| Copper | Traditional premium look, develops patina, commonly associated with soldered seams | Often where DIY becomes professional sheet-metal work |
| Galvanized steel | Strong and durable, but can rust if coatings are damaged or maintenance is neglected | Useful where strength matters, but rust management matters too |
| Zinc | Durable, forms a patina, generally priced above aluminum and below copper in trade descriptions | Better treated as a specialty material than a beginner’s first install |
| Galvalume | Commonly offered as a coated metal option in half-round systems | Performance depends on coating, climate, and install quality; avoid sweeping lifespan claims |
Aluminum is typically the easiest place for homeowners to start. This Old House describes it as lightweight, affordable, rust-resistant, and available in different colors, with the tradeoff that it dents more easily than heavier metals. For a low roofline where you want manageable section weight and widely available parts, that combination is hard to ignore.
Copper is the classic premium option. Both This Old House and JB Gutterman note its appearance and natural patina. The caution is method, not just price: copper half-round systems are commonly associated with soldered seams.
Galvanized steel brings strength and a more affordable starting price than copper, but This Old House notes the rust risk over time if the finish is not maintained. That can make it a reasonable choice where dent resistance matters, provided you accept the maintenance burden.
Zinc sits in the premium middle ground in many discussions. This Old House describes it as durable and patina-forming, typically pricier than aluminum but less costly than copper.
Galvalume appears regularly in supplier lineups, but the evidence pack does not support strong universal claims about it dramatically outlasting galvanized steel in every condition. The safer description is that it is another coated metal option whose real-world performance depends on site conditions, coating integrity, and compatible installation practices.
Whatever material you choose, keep the whole system compatible. Copper Gutter Supply specifically recommends matching hanger material to gutter material to reduce galvanic corrosion, and it mentions stainless steel or brass screws for metal systems. That matters even more with half-round because the hangers and fasteners are often visible and exposed.
Tools and Supplies Needed
A half round gutter installation goes much more smoothly if you stage the tools, hardware, and fittings before layout starts. Across homeowner and supplier guides, the core tool list is consistent: ladder, chalk line, measuring tape, level, drill/driver, snips, and fastening/sealing tools (Gutter Supply).
A practical homeowner checklist looks like this:
Basic layout and cutting tools - Ladder - Measuring tape - Pencil or marker - Chalk line - Level - Power drill/driver - Tin snips or aluminum snips - Needle-nose pliers
Joining and fastening tools - Compatible screws and fasteners - Caulking gun for gutter sealant - Pop rivets or manufacturer-approved screws - Hole saw or another approved method for outlet openings
System components - Half-round gutter sections - External brackets or hangers - End caps - Outlet fittings - Elbows - Downspout sections - Downspout straps or wall brackets - Miters if your layout includes corners
Those lists are supported across Gutter Supply, and Art of Gutter.
For aluminum, some installers use a miter saw for long, clean cuts. Building Moxie describes using a 10-inch compound miter saw with a carbide blade, while Art of Gutter mentions both miter saws and aviation snips. That does not mean every metal should be cut the same way.
Sealant choice also deserves more thought than homeowners often give it. Gutter Supply points users toward silicone-based gutter sealants suited to the material, while Copper Gutter Supply prefers a flexible EPDM-type sealant for metal joints. The usable takeaway is not that one chemistry always wins. It is that the sealant has to be compatible with the gutter material and the joint design.
Preparation Steps Before Installation
The quality of a half-round install is usually determined before the first bracket goes up.
Start by measuring the entire roofline and laying out downspout locations. Both This Old House and JB Gutterman treat measurement and outlet planning as first-order steps because outlet location determines pitch direction, section length, and bracket count.
As you measure, note:
- Total run length
- Inside and outside corners
- End-cap locations
- Outlet locations
- Porch roofs, trim, lights, or other obstacles that may interfere with elbows or downspouts
Then inspect the fascia board closely. This Old House advises checking for fascia rot before installation, and Copper Gutter Supply adds two useful preparation checks: confirm that the fascia is reasonably plumb and apply wood preservative where appropriate. Half-round brackets may be decorative, but they still need sound structure behind them.
Next, locate the rafter tails or other structural fastening points. This Old House recommends fastening into rafter tails where possible. Building Moxie adds a practical detail: on built-up fascia, installers often use 2-inch or longer screws to catch the rafter ends instead of relying only on trim stock. That distinction matters. A finished fascia cover is not always enough structure for a visible hanger system.
Now plan your slope. Most guidance in this evidence set points to about 1/4 inch of drop per 10 feet toward the outlet, including This Old House and Copper Gutter Supply. Building Moxie used 1/8 inch per 10 feet on one specific run. The careful way to interpret that is: 1/4 inch per 10 feet is a common planning rule, not a universal law. Use your manufacturer’s instructions and local requirements as the final word.
Finally, consider layout conditions beyond simple length. This Old House specifically says to account for local rainfall, roof pitch, and obstacles. On very long eaves, Copper Gutter Supply recommends rethinking the design rather than forcing a single long slope, suggesting a dual-slope layout on runs over 40 feet.
Setting Slope and Installing Brackets
If one part of half round gutter installation separates clean results from amateur-looking results, it is bracket layout. Because the hardware is exposed and the front edge is curved, inconsistent pitch is easy to spot.
Start at the end opposite the outlet. Building Moxie recommends laying out brackets from the far end back toward the outlet so the pitch remains consistent across the run. Mark the high point first, then calculate the low point from the run length and your target drop.
For most homeowner planning, a sensible working assumption is about 1/4 inch of drop per 10 feet toward the outlet, as recommended by This Old House and Copper Gutter Supply. But keep the caveat attached every time you use that number: some systems and some short runs are laid out differently, and Building Moxie shows one such example.
Once the high and low points are marked, snap a chalk line between them. This Old House, and Copper Gutter Supply all use a chalk or string line as the true reference for bracket placement. On half-round work, that line matters more than eyeballing.
Bracket spacing varies the most by system and condition, but a useful homeowner synthesis is possible:
- About 24 inches apart is the most common target across several guides, including Building Moxie, and Copper Gutter Supply.
- KWM Gutterman gives a tighter range of roughly 18 to 24 inches for a 5-inch half-round.
- This Old House mentions broader spacing in the 24- to 36-inch range, while also referencing a 32-inch maximum in its summary language.
A quick reference:
| Bracket spacing approach | When it makes sense |
|---|---|
| 18–24 inches | Heavier metals, stricter manufacturer guidance, or conditions that argue for tighter support |
| Around 24 inches | Common planning target for many homeowner installations |
Bracket position matters too. Building Moxie places brackets about 3/4 inch below the roof underside, and both This Old House and Copper Gutter Supply say the gutter should sit slightly below the roof plane so runoff drops into the trough cleanly. That lower placement is one reason fascia mounting appeals to homeowners: Copper Gutter Supply notes that fascia mounting avoids disturbing shingles.
When fastening brackets, aim for structure, not just finish material. This Old House recommends screwing into rafter tails where possible. Building Moxie suggests 2-inch-plus screws on built-up fascia to catch those rafter ends. Copper Gutter Supply adds that pilot holes can help prevent splitting.
Hanging Gutter Sections and Making Joints
With the brackets installed and checked against your line, you can move to the gutter sections. This part goes better if you dry-fit first, especially around corners and outlets.
Mark each cut carefully before cutting. For aluminum systems, common homeowner methods include tin snips or a miter saw, both mentioned by This Old House, and Art of Gutter. Cut slowly enough to keep the edge clean, then test-fit before sealing anything permanently.
For sectional systems, the usual joint method is a modest overlap plus sealant plus mechanical fastening. This Old House recommends about a 1-inch overlap, then sealing and securing the joint with rivets or screws. Gutter Supply likewise points homeowners toward pop rivets for thin metal components. If your system uses proprietary connectors or slip fittings, follow that design instead of improvising.
A sensible sequence is:
- Cut and label each section.
- Dry-fit the full run.
- Apply compatible sealant to the joint area.
- Seat the overlap or connector.
- Rivet or screw the connection.
- Set the assembled sections into the brackets and secure per system design.
Sealant compatibility matters. Copper Gutter Supply favors an EPDM-style sealant for metal joints, while Gutter Supply discusses silicone-based gutter sealants. The safest guidance is simple: use a sealant approved for the gutter material and joint method you are installing.
Metal compatibility matters too. Copper Gutter Supply warns against mismatching hanger and gutter metals because of galvanic corrosion risk, and it specifically notes stainless steel or brass screws for metal systems. Half-round gutters make that issue more visible because the support hardware is not hidden.
For copper half-round gutters, many installers still prefer soldered seams. That association appears in both This Old House and Joyland Roofing. What homeowners should take from that is not a do-it-yourself soldering lesson, but a threshold: when the install moves from cutting, hanging, and sealing into specialized metal joinery, it may no longer be a reasonable first-time DIY project.
Adding Downspouts and Finishing
Downspouts complete the system. A neat gutter run still fails if the outlet work leaks or dumps water where you do not want it.
To cut the outlet opening, common methods include a starter hole plus snips or a hole saw sized to the outlet fitting. Building Moxie describes drilling a 1/2-inch starter hole and then finishing the cut with snips. Gutter Supply mentions using a hole saw. Either method can work if the hole matches the outlet and leaves a clean edge.
Once the opening is cut, attach the outlet tube or drop outlet with compatible sealant and approved fasteners. Art of Gutter describes connecting outlet tubes before final downspout assembly, and Building Moxie uses sealant plus rivets on outlet work.
JB Gutterman recommends corner placement, and Art of Gutter treats outlet placement as an early layout decision. Treat that as a common design pattern, not a rule that every house must follow.
Support the downspout with wall straps or brackets at regular intervals. This Old House recommends downspout brackets every 6 to 8 feet. In one homeowner example, Building Moxie describes setting downspout hardware about 1 inch from the wall to clear siding and trim. Use elbows or offsets as needed to clear trim boards, ledges, and projections.
For long runs, revisit the layout before you declare the job finished. Copper Gutter Supply recommends considering a dual-slope layout when the run exceeds 40 feet. In practical terms, that means adding outlets or changing the pitch plan instead of forcing one long visible slope.
After the downspouts are secured, test the whole system with water. You are looking for three things:
- Water moves steadily toward the outlet.
- Joints do not drip underneath.
- Water discharges away from the house rather than collecting beside the foundation.
That last point is the real measure of success. Art of Gutter notes that gutters protect the home by directing roof runoff away from the foundation, so the discharge path matters just as much as the gutter profile.
Maintenance, Troubleshooting, and Pro Thresholds
Even a well-installed half-round system still needs maintenance. The curved, open trough may be relatively easy to inspect, but it is still exposed to leaves, twigs, grit, and seasonal buildup. If you have overhanging trees, check them more often.
If you want guards, choose a product designed for the profile. Art of Gutter says half-round gutters often need profile-specific guards, and This Old House overview notes that many guard products are designed around K-style geometry instead. So yes, guards may reduce maintenance, but only if the guard actually fits your half-round bead and bracket layout.
When troubleshooting, start with the obvious points:
- Drips at overlaps, end caps, and outlet fittings
- Standing water that suggests poor pitch
- Sagging between brackets
- Loose fasteners
- Failed sealant at joints
This Old House specifically recommends checking for leaks and sagging and correcting them by tightening brackets or resealing joints. Because half-round gutters are visually exposed, even small alignment issues can be noticeable.
There are also clear limits to reasonable DIY work. If the roof is high, steep, or awkward, the project stops being mainly about gutters and becomes a roof-edge access problem. If the fascia is rotted or structurally questionable, you are doing exterior carpentry before gutter installation. If the system is copper and relies on soldered seams, you are moving into specialty metalwork. Those thresholds are reflected across, and This Old House overview.
A practical stop-and-hire list:
- The fascia needs repair or replacement before any gutter hardware can be mounted.
- You cannot work comfortably and stably from the ladder position required.
-
The roofline is tall, steep, or broken up by multiple planes and trim details.
-
Local snow, ice, or similar loads may require closer support spacing than generic homeowner guidance covers.
For homeowners, fascia mounting is often the simpler route because it avoids disturbing shingles. But simpler does not mean easy. Half-round gutter installation succeeds when the slope is deliberate, the brackets are structurally anchored, the joins are compatible with the metal, and the finished system actually sends roof water away from the foundation.
What slope should half-round gutters have?
A common starting point is about 1/4 inch of drop per 10 feet toward the outlet, and that figure appears in both This Old House’s installation guide and Copper Gutter Supply’s fascia-mount guide. One DIY project at Building Moxie used 1/8 inch per 10 feet on a specific run, so the best homeowner answer is to treat 1/4 inch per 10 feet as a common rule of thumb, then verify it against your system instructions and local requirements.
How far apart should brackets be for half-round gutters?
For many homeowner installs, around 24 inches apart is the practical planning target. Published guidance ranges from about 18 to 24 inches in KWM Gutterman’s comparison to roughly 24 inches in Building Moxie’s walkthrough and Joyland Roofing’s comparison, while This Old House mentions broader spacing into the low 30-inch range in some contexts. Use the manufacturer’s requirement first, and move toward closer spacing for heavier materials or tougher conditions.
Can I DIY half-round gutter installation?
This Old House’s step-by-step guide is clearly written to help homeowners understand the process, and Art of Gutter’s guide also presents step-by-step installation. But other sources, including Joyland Roofing and This Old House’s half-round overview, stress that half-round systems are less forgiving than K-style because alignment is more visible and copper systems may require soldering.
Do half-round gutters need special guards?
Often, yes. Art of Gutter says half-round profiles may need guards designed specifically for that shape, and This Old House’s half-round overview notes that many guards are built around K-style gutters instead. If you add guards, confirm that they fit your gutter bead, bracket style, and downspout layout.
How do half-round gutters compare to K-style for installation?
Half-round gutters generally demand more precise layout. That distinction is reflected in Joyland Roofing’s comparison, and This Old House’s half-round overview. For homeowners, the short version is this: half-round is often the more architectural choice, while K-style is usually the faster and more forgiving install.