
Stop the Drip Without Guessing at the Part
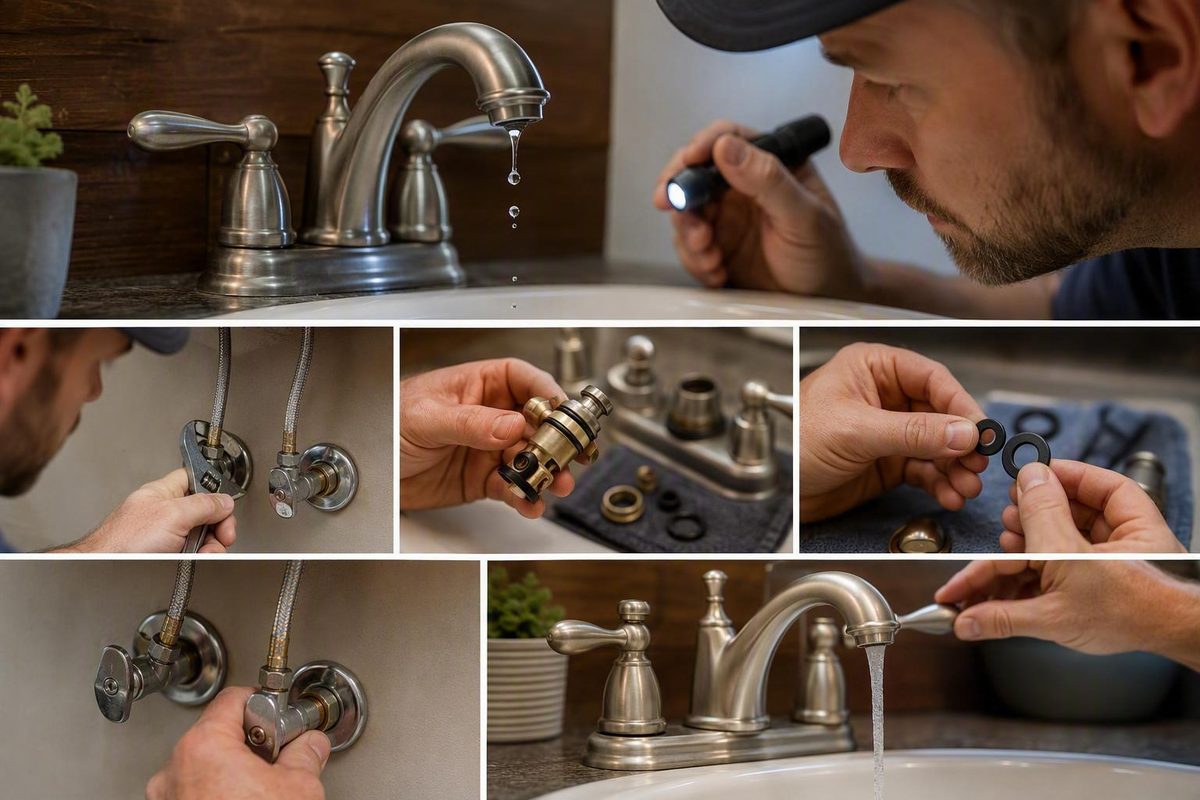
Find where the leak starts, identify the faucet mechanism, isolate and drain both supplies, then fit an exact-match part and test every connection.
To fix a leaky faucet, first locate where the water begins, identify the faucet model and mechanism, close both water supplies, and open the faucet to drain residual water. Document the assembly as you take it apart, inspect the sealing components, and install only a verified matching part. Reassemble everything in its original order, restore the water gradually, and inspect every visible connection.
Do not start disassembly unless you can reliably isolate the water. If a local shutoff will not close or begins leaking when operated, stop and use the verified household main only if it works properly. Do not strike a stuck handle or force seized hardware; municipal faucet-repair guidance from Portland likewise emphasizes isolating and draining the supply and warns against banging a stuck handle.
A cracked or heavily corroded faucet body, concealed leakage, inaccessible plumbing, unavailable parts, or repeated repair failure is a reason to consider replacement or professional assessment rather than deeper disassembly. These conditions fall outside a straightforward seal or valve repair, as reflected in this repair-versus-replacement guidance.
The short answer: diagnose, isolate, repair, and test
Use this sequence instead of buying a generic washer kit and hoping one part fits:
- Locate the start of the leak. Dry the faucet and cabinet, then determine whether water first appears at the spout, handle, faucet base, spray hose, or a connection below the sink.
- Identify the faucet. Find the brand, model, and mechanism before selecting a replacement part.
- Isolate the water. Close both under-sink supply valves. If the sink has no local valves, use the verified household main shutoff.
- Drain the faucet. Open the faucet after isolation to release pressure and drain residual water.
- Document and disassemble. Take photos, cover the drain, protect the finish, and preserve the order and orientation of clips, seals, tabs, and other parts.
- Inspect before replacing. Look for a worn washer, damaged O-ring, deteriorated seat or spring, faulty retaining screw, valve-seat damage, debris, or a model-specific cartridge problem.
- Install an exact replacement. Match the part number, dimensions, shape, tabs, and required orientation.
- Reassemble and test. Restore the supply gradually, test hot and cold operation, and inspect the spout, handles, base, hoses, shutoffs, and supply connections.
A dripping spout does not automatically mean the faucet needs a washer. A compression faucet may use a stem washer and valve seat, while other designs may rely on cartridges, ceramic-disc assemblies, or ball assemblies with seats and springs.
The repair is worth addressing promptly, but the amount of water wasted depends on the drip rate. The EPA says a faucet dripping once per second can waste more than 3,000 gallons per year.
Find where the water actually starts
Dry the faucet, sink rim, backsplash, supply lines, spray hose, and cabinet floor. Then operate the faucet while watching for the first bead of water.
| Visible symptom | Components to inspect | Next safe action |
|---|---|---|
| Spout drips while faucet is off | Compression washer and valve seat, cartridge, or compatible ball-faucet seats and springs | Identify the mechanism and model before opening the valve assembly |
| Water appears around a handle or stem | O-ring, packing component, retaining hardware, or model-specific cartridge | Dry the area and watch where the first bead appears |
| Water collects around the faucet base | Handle leak, spout seals, body seal, mounting area, or water traveling from above | Dry everything, then operate each control separately |
| Water appears when the spray head is used | Spray hose, hose coupling, diverter area, or damaged hose | Run the faucet without the sprayer, then test the sprayer separately |
| Water appears below the sink | Supply-line joints, shutoff valves, faucet shanks, spray-hose connections, or migrated water | Observe each dry connection during separate hot, cold, and spray tests |
| Two-handle faucet drips from the spout | Hot-side or cold-side valve assembly | Note whether the leaking water is hot or cold before isolating both supplies |
On a two-handle faucet, water temperature can help identify which side needs inspection. It does not establish whether the failed component is a washer, O-ring, stem, cartridge, seat, or another model-specific part.
For a base or under-sink leak, test one function at a time. Run cold water, then hot water, then the spray hose. Watch the shutoff valves, supply-line joints, faucet shanks, hose couplings, and underside of the faucet base during each test.
Use the leak location to narrow the inspection—not to make the final diagnosis.
Identify the faucet and find an exact replacement part
Look for the brand and model on:
- The original box or receipt
- Installation instructions or product literature
- A tag attached to a supply line
- A stamp or label on the faucet or mounting hardware
- Identifying marks on the handle, escutcheon, trim, or valve
- A product specification sheet saved by the installer or previous owner
Before disassembly, photograph the complete faucet, handle arrangement, spout, supply-line tags, and visible markings. Take another photo after removing each layer. Record the direction of the stem, cartridge tabs, retaining clip, hot-and-cold markings, and the order of washers and seals.
For a known model, use the manufacturer’s current product page and parts diagram as the primary compatibility check. Match the service part to the exact faucet rather than relying on brand, handle count, or visual similarity alone.
For example, Delta says most of its sink faucets made since 2012 have a model tag attached to a supply line. It also provides an identification tool for faucets without an obvious model number. Delta’s model-number guidance explains the possible tag locations and identification process.
KOHLER uses a similar sequence: identify the product, open the corresponding parts diagram, and select the listed service part. Model information may appear on packaging, literature, specification sheets, or a stamp on the product, according to KOHLER’s service-parts process.
Moen’s repair library shows why appearance alone is not enough. Its instructions are divided by cartridge number, faucet configuration, handle layout, and sometimes manufacturing period. The Moen article library lists separate procedures for different cartridges and production ranges.
If functioning local valves isolate only the faucet, you can take the removed component, model information, and photos to a plumbing-supply counter while the rest of the home remains supplied. If isolating the faucet requires closing the household main, do not leave the property to shop unless you have observed that the main remains closed without leaking and are prepared for the home to remain without water.
Two parts that look alike may still differ in diameter, length, tabs, clip position, seal profile, or orientation. Confirm the match before installation.
Shut off the water and prepare the work area
Gather the supplies appropriate to the identified faucet and repair:
- Correct flat-head or Phillips screwdriver, or the specified hex key
- Adjustable wrench
- Suitable pliers, but only where the model instructions call for them
- Towel or absorbent cloth
- Masking tape or a cloth for finished surfaces
- Container for screws, clips, springs, and other small parts
- Verified replacement part
- Phone or camera for documenting the assembly
Close both under-sink supply valves, even if the leak appears to come from only the hot or cold side. If local valves are absent, close the verified household main. Open the faucet afterward to release pressure and let residual water drain before loosening any retaining hardware.
Place a towel over the drain so a screw, clip, or spring cannot fall into the plumbing. Protect finished surfaces before using a wrench, and use a tool that fits the fastener correctly.
If a properly fitted tool and moderate pressure will not move a handle, nut, or retainer, stop and check the model instructions. Do not strike the component or escalate to uncontrolled force.
Thread tape, penetrating oil, petroleum jelly, and other lubricants are not universal faucet-repair materials. Some model-specific procedures call for a particular material at a particular joint or seal; others do not. Use only what the faucet manufacturer specifies, in the location and amount specified.
Repair a compression faucet by replacing the exact-match washer
This procedure applies to a compression-type stem faucet. It does not apply to every two-handle faucet and should not be transferred to cartridge, ball, or ceramic-disc designs.
After shutting off both supplies and opening the faucet to drain it:
- Remove the decorative cap, if present.
- Remove the handle screw and lift off the handle.
- Loosen the packing nut with a correctly sized wrench.
- Withdraw or unscrew the stem while preserving its orientation.
- Inspect the washer at the bottom of the stem.
- Inspect the washer-retaining screw, stem, and visible valve seat.
- Remove the retaining screw and worn washer.
- Install an exact-match washer, replacing the screw if it is damaged.
- Reinstall the stem, packing nut, handle, screw, and cap in their original order.
The replacement washer must match the original diameter and profile, including whether it is flat or beveled. A washer that only nearly fits may not seal correctly. This stem-removal and exact-match washer procedure is specific to compression faucets, as shown in these compression-faucet repair instructions.
Inspect the valve seat—the surface against which the washer closes—with a light. If it is visibly pitted, corroded, cracked, or uneven, replacing the washer alone may not stop the drip. Some removable seats require a dedicated seat wrench; uncertain or extensive seat damage warrants professional assessment or faucet replacement.
Reassemble the components securely, but do not keep tightening them in response to a persistent drip. If the faucet still leaks, isolate the water again and reassess the part, orientation, retaining screw, and valve-seat condition.
For cartridge, ball, and ceramic-disc faucets, follow the model-specific branch
The general workflow remains the same: shut off and drain the supply, remove the handle and specified retaining hardware, inspect the assembly, install a verified replacement if indicated, reassemble, and test. The internal procedure depends on the model.
Cartridge faucets: Confirm the faucet model and cartridge number before removal. Retaining clips, bonnet nuts, cartridge tabs, stem lengths, locating features, and orientation marks vary. Do not replace the cartridge merely because the spout drips; first use the manufacturer’s troubleshooting information to determine whether the cartridge or another seal is the likely source.
If cartridge replacement is indicated, compare the part number and locating features with the model diagram. Photograph the installed position before removing it, and follow the manufacturer’s orientation markings during installation.
Delta ball-valve example: For covered Delta faucets that use a ball assembly with seats and springs, the manufacturer’s procedure removes the handle, cap, ball, cam and packing, followed by the compatible seats and springs. Required components are then replaced and the faucet reassembled. Delta states that this ball-valve repair procedure does not apply to faucets using its DIAMOND Seal Technology.
Do not transfer Delta part numbers, component order, or repair steps to another manufacturer—or even to an unidentified Delta faucet. Brand alone does not establish the mechanism or compatible service part.
Ceramic-disc faucets: Generic guidance does not establish one internal repair procedure for every ceramic-disc model. Seals, disc assemblies, retainers, and the appropriate replacement scope vary. Identify the model and follow its manufacturer service instructions rather than treating it like a compression faucet.
Restore the water slowly and troubleshoot a persistent leak
Reinstall the handle and all retaining hardware before restoring the supply. Leave the cabinet and work area exposed so you can see the faucet base, shutoff valves, supply connections, and hoses.
Open the supply valves gradually. Pause to inspect the shutoffs and line connections before operating the faucet. Test cold and hot flow separately, followed by mixed flow and the spray hose if present. Confirm that the handle moves normally and that the controls operate in the correct direction.
Inspect:
- Both shutoff valves
- Supply-line connections
- Faucet shanks and mounting area
- Handle and stem openings
- Spout and faucet base
- Spray-hose connections
- Cabinet floor
If flow is restricted after the repair, inspect or clean the aerator according to the faucet instructions. Preserve the order of the aerator’s screens and internal pieces during removal.
If the drip continues, do not respond by repeatedly tightening components. Shut off the water again and verify:
- Replacement part number and dimensions
- Washer shape and orientation
- Cartridge or stem orientation
- Clip, spring, and seal order
- Retaining-screw condition
- Valve-seat condition
- Debris or mineral material in the assembly
- Whether the correct hot or cold side was repaired
- Whether water is traveling from another connection
| Condition | Best next step |
|---|---|
| Model, part, and assembly are identifiable | Continue with model-specific troubleshooting |
| Exact part fits but the drip persists | Recheck orientation, retaining parts, debris, and valve-seat condition |
| Correct service part is unavailable | Consider replacing the faucet |
| Faucet body is cracked or heavily corroded | Replace it or obtain professional assessment |
| Shutoff valve leaks or will not isolate water | Stop and have the isolation problem corrected |
| Water is concealed or connections are inaccessible | Call a plumber before opening walls, cabinets, or fixtures |
| Repair repeatedly fails | Reassess the diagnosis and consider replacement |
The decision path is simple: locate the source, identify the faucet, isolate and drain the water, and replace only a confirmed matching component. Then restore the supply gradually and inspect every visible connection. If isolation fails, the body is cracked or heavily corroded, the leak is concealed, or compatibility cannot be confirmed, stop before a small drip becomes a larger repair.